• Portfolio
  • Contact
  • Blog
  • Shop

Thomas Campone Photography

Chicago based travel photographer

  • Portfolio
  • Contact
  • Blog
  • Shop

Michigan Avenue Tulips

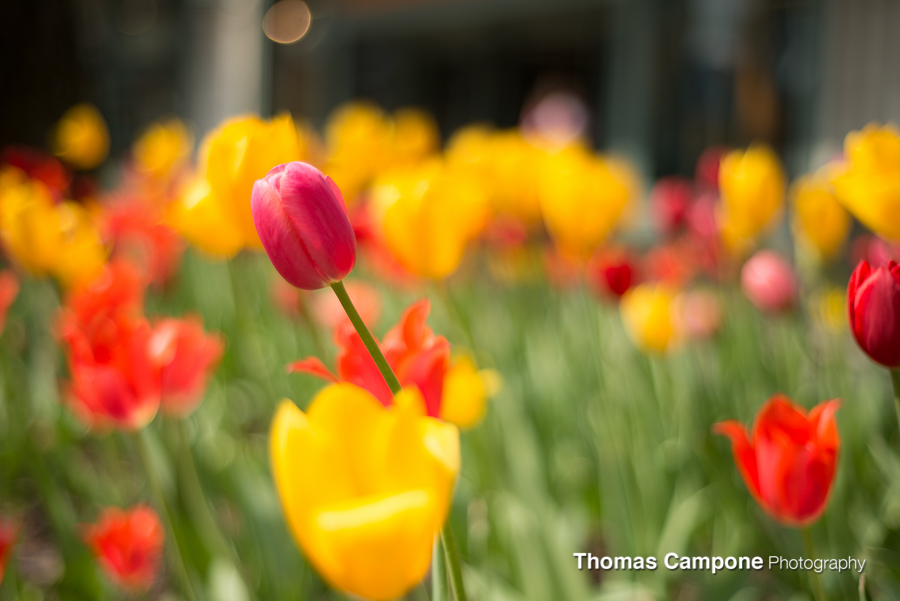
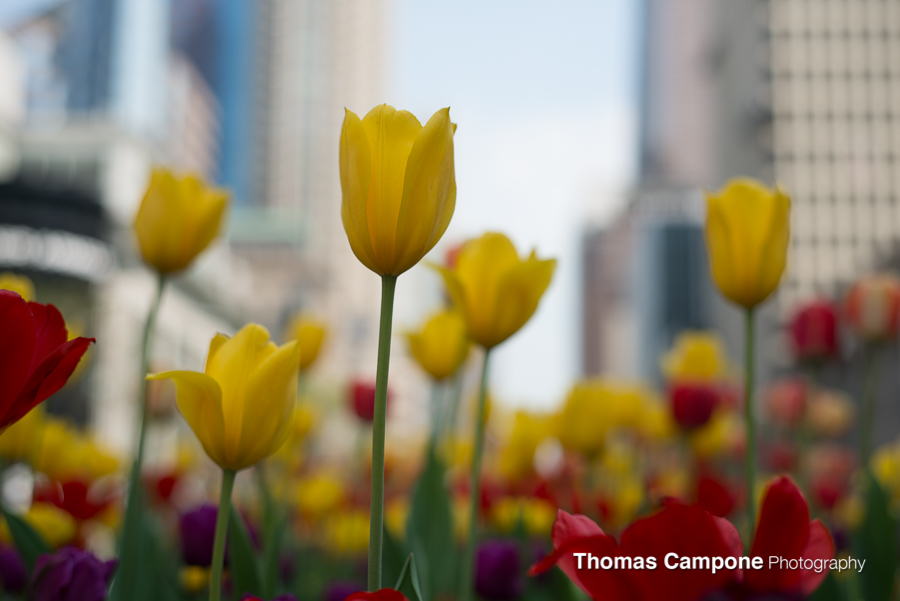
The city of Chicago does an outstanding job each year decorating the streets with seasonal plants and flowers. One of my favorite times of year is in the spring when the planters down Michigan Avenue are full with blooming tulips. The plantings go on for a couple of miles and stretch the Magnificent Mile all the way south to Roosevelt St. I've wanted to shoot the tulips for a couple of years but they are only in bloom for a week or two at the most and depending on the spring, they may not all bloom at the same time which makes for less than ideal photos. 

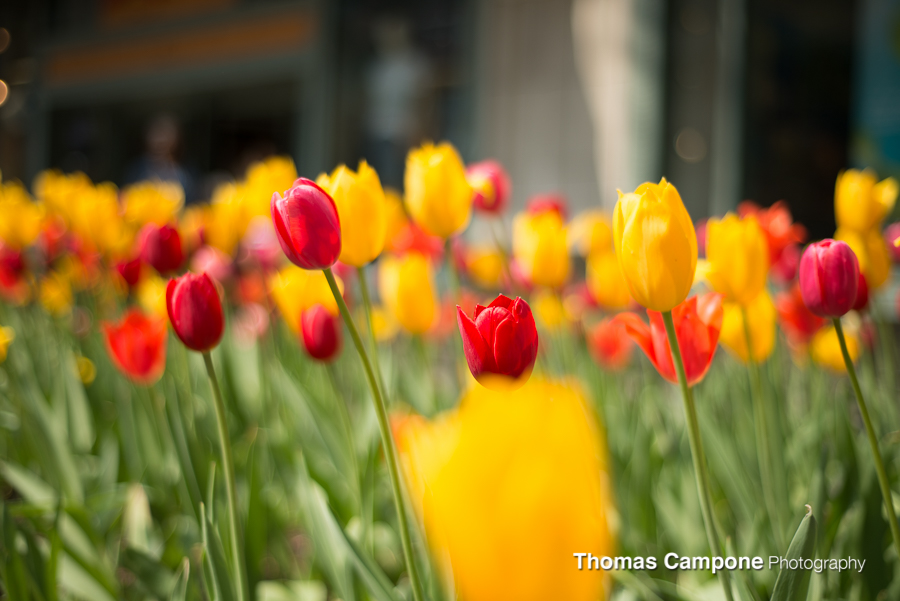
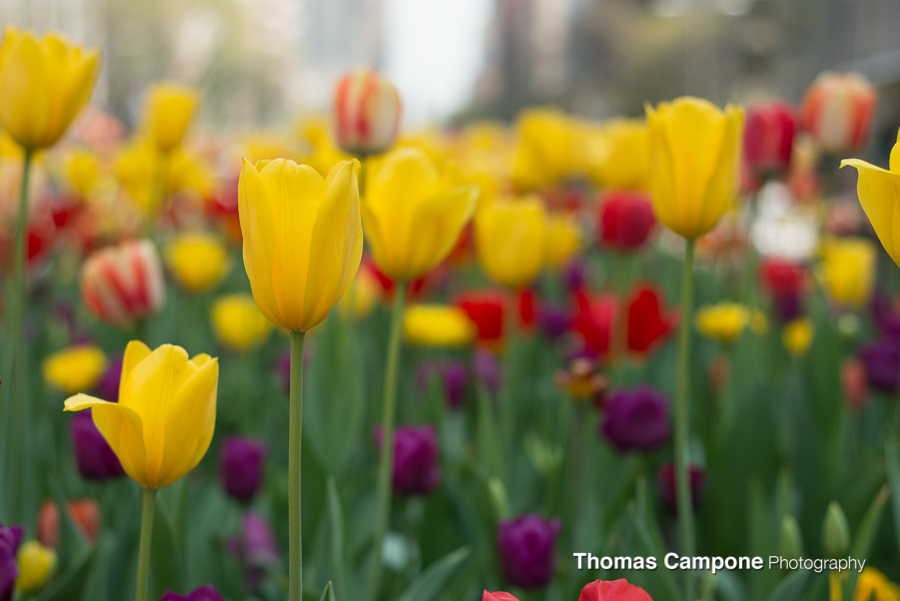
This year I finally got the perfect opportunity and I took it. We had a wonderful spring so all the tulips were open at the same time and I had a week day to get out and shoot. This cut down on the tourists that normally flock to the area and I was able to shoot for an hour uninterrupted. It's hard to explain what miles of fully bloomed tulips look like, but if you ever take a spring trip to Chicago, you won't be able to miss them. 

tags: Chicago, Tulips, Flowers, Spring
Monday 09.07.15
Posted by Thomas Campone
 

The Photographer's Guide To Capturing Chicago - Honeycomb

Buy Now - $4.99

The Honeycomb is a relatively unknown Chicago landmark located in the Lincoln Park neighborhood, which is about a mile north of downtown. The sculpture is located in the Lincoln Park Zoo’s Nature Boardwalk and is just east of the free outdoor zoo. The name of the structure is the “People’s Gas Education Pavilion”. The structure faces south directly towards downtown and provides a nice view of the John Hancock building through its arch. 


How to get the Shot 

This photo was taken at 27mm. This is considered a wide angle lens which exaggerates the length of objects and causes an illusion of exaggerated distance between images close to the lens and further away in the frame. You can see this in the image above because the front sections of the Honeycomb are much larger than the back of the Honeycomb even though the structure is only approximately 30 feet long. This image was created using my high dynamic range workflow with Photomatix Pro. I used 3 exposures to capture this image (-2, 0, +2). I took the image about 2 feet off the ground using a tripod. It was around 7 am on a fall morning. The sky was quite overcast, but it worked well for this shot. The structure is lit up with warm lights still on from the night before. 

Editing the Shot 

This shot was edited using Photomatix Pro. The 3 images were imported into Aperture first and then out to Photomatix. I usually edit or blend one of my exposures back into the HDR image to tone down the Photomatix HDR effect, but in this case I loved the image that I got from Photomatix so I didn’t do any editing afterwards. To the right you will see the settings I used to process this image. 


Other Tips 

This area is becoming more popular each season, so I suggest getting to the park early. I don’t believe there are hours of operation for this park, so the earlier the better. If you get to the park early you could get a nice sunrise in the shot as well as the city.

I would also suggest using a wider angle lens. I’ve seen other shots at this location with a longer lens and they don’t pop quite as much. Shoot low and wide and you should get an interesting shot. 

How to Get There 

This area is not that easy to get to if you don’t have access to a car. The closest El stop is Fullerton Avenue, a 30 minute walk. You could take the El to Fullerton and take a taxi or bus East on Fullerton, but if you have access to a car you should use it. There is street parking and a few reasonable lots across the street from the zoo. Try to avoid the Lincoln Park Zoo’s parking, as it’s very expensive. Try to park in the pay lot just on the north side of Fullerton across the street from the zoo’s parking lot. 

Shop Etsy Store

The Photographer's Guide To Capturing Chicago

This post is part of an eBook I wrote about the best places to photograph Chicago. If you enjoy this post consider buying the ebook to support my site and to get access to all the best locations in Chicago!

Want to read more?

The Photographer’s Guide to Capturing Chicago - $8.99

tags: Chicago, Chicago Skyline
categories: Chicago
Friday 08.14.15
Posted by Thomas Campone
 

The Photographer's Guide To Capturing Chicago - Cloudgate at Sunrise

Buy Now - $4.99

Millennium Park is a special place in Chicago. It was built to celebrate the new millennium and is host to multiple public art displays including Cloudgate and the Jay Pritzker Pavilion. Millennium Park is a tourist magnet, but the beauty of the park is enjoyed by the residents of the city as well. 


How to get the Shot 

Cloudgate (commonly called “The Bean”) is usually crowded with tourists all day. I find that photos with large crowds distract from the beauty of the subject. To get a clean shot you have to get to the park early, as in 5:30 A.M. When I showed up I was greeted by a security guard who wouldn’t let me in the park right away. I didn’t realize that the park had official hours since it has no entrance or gate. The park officially opens at 6 A.M., but if you are shooting in the summer the sun rises around 5:40. After talking to the guard for a few minutes he decided to let me in at 5:45. This worked out well because I was able to snap a few shots while the light was good and before the sun came over the trees and structures to the east. Shortly after I captured my shots, more photographers and people arrived at the park.

Editing the Shot  

This shot was processed with Apple’s Aperture and then taken into Adobe Photoshop to be finished. I knew that I wanted to capture The Bean with the city blurred out behind it, but I couldn’t achieve this in camera. In order to capture the shot I envisioned, I applied a medium strength Gaussian blur and painted it into the background of the shot. This gives the image a different twist than the other photos from this location. 


Other Tips 

Shooting “The Bean” from different angles reveals unique reflections and endless photo  opportunities. Also remember to go underneath the structure as the concave metallic shape provides

fun and interesting reflections. After multiple visits to Millennium Park, I’ve come to appreciate the view from the west side of the bean with the city distorted in the reflection. Make sure to shoot from this view while you are there. 

How to Get There 

Millennium Park is right off of Michigan Avenue, so it is very accessible. The number 3 bus runs straight down Michigan Ave; get off at Madison Street. You can also take the Red or Blue line. If you take the Red line get off at the Monroe stop and head east. If you take the Blue line get off at the Washington stop and head east. 

The Photographer's Guide To Capturing Chicago

This post is part of an eBook I wrote about the best places to photograph Chicago. If you enjoy this post consider buying the ebook to support my site and to get access to all the best locations in Chicago!

Buy Now
tags: Chicago, Cloudgate
categories: Chicago
Thursday 07.30.15
Posted by Thomas Campone
 

The Photographer's Guide To Capturing Chicago - Chicago Board of Trade

Buy Now - $4.99

The Chicago Board of Trade is the world’s oldest futures and options exchange, located at the end of the financial district in downtown Chicago. The top of the building is capped with a 31 foot statue of the Roman goddess of grain, Ceres. The Board of Trade building is a classic Chicago skyscraper with hard and strong lines. It dramatically caps LaSalle Street and sits perpendicular to the other buildings that line the street. 


How to get the Shot 

There are many locations along LaSalle Street where this shot can be captured. I prefer to use a wide angle lens closer to the building. This image was taken at Adams Street and LaSalle Street (the green check mark). If you have a longer lens you can walk further North on LaSalle and shoot South towards the Board of Trade. There are some high medians that would allow for a good vantage point while maintaining the symmetry of the shot. There is also an elevated train track at Lake Street that has a great view of all of LaSalle Street. If you ride the Orange, Pink, Brown, Green or Purple lines in the Chicago Loop, you will cross LaSalle Street. They all travel East on this stretch of tracks so you won’t have another train passing or blocking your view. You will have to shoot through the train’s windows, but it is another elevated, interesting view of LaSalle Street.

Since this is the main financial district, this area of town is very busy during the week. This shot was taken around 7:30 on a Saturday morning to avoid the crowds and traffic. 

Editing the Shot 

This shot was processed using Photomatix Pro by HDR Soft. This particular image was processed using 3 images (-2 exposure, 0 exposure, +2 exposure) at an aperture of f11. I used a tripod to capture the 3 images so that they were perfectly aligned. Once I got the images into Lightroom, I exported them to Photomatix and used the settings on the right to process the image. Once I had the image processed, I used the correctly exposed image from the series of bracketed photos to paint in some of the exposure that I thought made the photo look better. For example, in this photo I painted back in the sky because of the exposure, color, and clouds.

Although wide angle lenses tend to have good depth of field, I still prefer to shoot with a higher aperture. In this example I shot this image at an aperture of f11. You can definitely get away with shooting more wide open, but if you don’t have a specific reason to do this then I would shoot in the middle of the aperture range for clarity. One of the downsides of shooting with a smaller aperture is that you will need to exposure your images longer. In this image you can see the blur of the flags in the shot due to the longer exposure. I think these types of effects add to the allure of the shot. 

Other Tips 

I recommend shooting in the morning on the weekend. This will cut down on the traffic and number of people in and around your shot. The city allows free parking on LaSalle Street on the weekends and this can add to the clutter of your shot. The absolute best time to shoot would be in the summer just after dawn when the streets are empty. 

How to Get There 

Downtown, “The Loop” is very central from almost any neighborhood. My suggestion is to take the Red line to Monroe stop. This will drop you off 3 blocks from the area you will be shooting. You can always take a cab, but this location is not very time sensitive. 


The Photographer's Guide To Capturing Chicago

This post is part of an eBook I wrote about the best places to photograph Chicago. If you enjoy this post consider buying the ebook to support my site and to get access to all the best locations in Chicago!

tags: Chicago, Chicago Loop, Chicago Board of Trade
categories: Chicago
Wednesday 07.15.15
Posted by Thomas Campone
 

The Photographer's Guide To Capturing Chicago - Birds Eye View of Chicago

“Birds Eye View of Chicago” was taken from a helicopter at sunrise over Northerly Island, just South of downtown Chicago. The south side of the city offers a breathtaking view of Chicago especially when seen from a helicopter. Chicago Helicopter Express offers private flights from Midway Airport, which is about 10 miles from downtown and easy to access by public transit.  They also recently started offering flights from the near south side of the city.


How to Get the Shot 

If you are shooting from a moving helicopter, you have to make sure that you have the correct settings before you take off. Otherwise you might come home with a memory card full of blurry images. If you have a 24-70 f2.8 or a similar lens I would consider bringing that lens. Long lenses (100+ mm) are great but you will probably want to capture some scale with your images and a mid range zoom will help you get capture the scale of the city and buildings.

During this particular shoot I brought 2 camera bodies with me. One body had my 28-70 f2.8 lens and the other body had a 80-200 f2.8. I ended up using the 80-200 f2.8 much less than the wider lens.

If you schedule your ride at sunrise or sunset, the light will constantly change. For this reason I would consider setting up your camera before you take off. You will need to shoot with a shutter speed of 1/250 second or faster to make sure your photos are in focus, but I would consider a shutter speed of 1/500 if you can achieve it with the limited light. I got lucky with the photo above at 1/200 but I had some blurry shots even at 1/500 so if you have enough light to shoot at an even faster shutter, I suggest you do so.

It is difficult to balance the ISO and Aperture with a limited time to capture your shot. While in the air, consider shooting with a more open aperture for two reasons:

  1.   You need the light for a faster shutter speed (target 1/500 sec or faster)

  2.   If you are shooting through a window, you will be less likely to pick up any dirt or scratches

Depending on the lighting, I try to aim for no less than f5.6 so that I can get decent depth of field. Even at this aperture I had to shoot with an ISO of over 1000 to achieve my target shutter speed. On most modern cameras this won’t be an issue, but make sure you set your camera to manual mode or aperture priority before you get in the helicopter. You can also shoot with auto ISO turned on which will automatically change the ISO to achieve the shutter speed you want. If you set up your camera before you leave, you can focus on the shots you want when you are in the air. 

Editing the Shot 

There wasn’t much I needed to do to make this shot look great. I used the Basic Lightroom panel to make a few additional changes which are shown to the right. I also increased the sharpening significantly for this image. In this case the image was clean and the lines of the buildings looked much better with the increased sharpening setting.

The shot really speaks for itself and very little additional editing was done. I did need to take out a some minor glare that was from the window of the helicopter. This was accomplished in Photoshop with a few quick steps using the levels adjustment layer. 

Other Tips 

If you opt to take the helicopter tour I suggest you opt for one hour or less. Once you take off from Midway you will only be 5 minutes from downtown. If you opt for the one hour flight you will have plenty of time to capture everything from the University of Chicago on the south side to Wrigley field on the north side. You probably can get away with a 30 minute or 45 minute tour.

I’ve included a map of some of the locations I would recommend shooting from during your helicopter tour. Remember that the sun rises over the lake, so you will get better views from the east side of the city during early morning hours and from the west side during sunset.

If you decide not to spring for a helicopter tour, I would highly suggest getting up early one day and spending a sunrise at the Adler Planetarium. This location has one of the best views of Chicago on land, especially at sunrise or night. Below is one of my photos from this location during one of the many summer firework sessions. 


How to Get There 

Most helicopter tours leave from Midway Airport. From the city you can take the Orange line all the way to the end of the line (follow the Midway signs) or you can take a cab. A cab ride from downtown will cost you between $25 - $30 and it will take you 25 minutes with no traffic. Chicago Helicopter Express' new location is about 3 miles south of downtown and is a quick cab ride from most locations. 

If you decide to ride the “El” it should take about 30 minutes to get to the airport from downtown. Just hop on the closest Orange line train and take it to the end of the line. The trains run less frequently on the weekend but the ride is only a handful of stops from downtown.

I personally prefer to take public transportation if possible but if you are shooting at sunrise it may make sense to take a cab to the airport and take the train back to the city. 

The Photographer's Guide To Capturing Chicago

This post is part of an eBook I wrote about the best places to photograph Chicago. If you enjoy this post consider buying the ebook to support my site and to get access to all the best locations in Chicago!

tags: Chicago, How To, Cityscape
categories: Chicago
Wednesday 07.01.15
Posted by Thomas Campone
 
Newer / Older

Powered by Squarespace.