• Home
  • Blog
  • Shop

Thomas Campone Photography

Chicago based travel photographer

  • Home
  • Blog
  • Shop

18th Street Bridge

62mm - f10 - 1/200 sec -  ISO 400

62mm - f10 - 1/200 sec -  ISO 400

Buy Now - $4.99

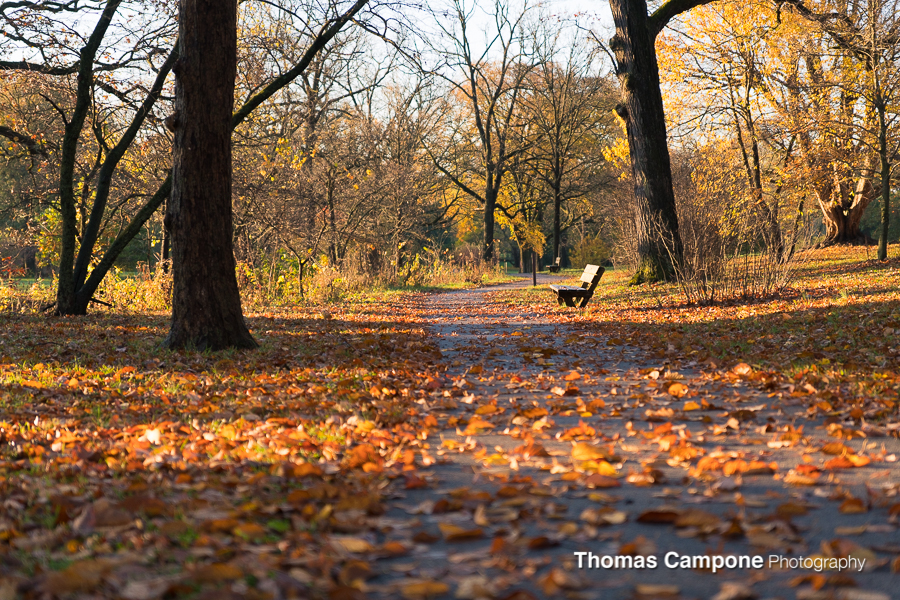
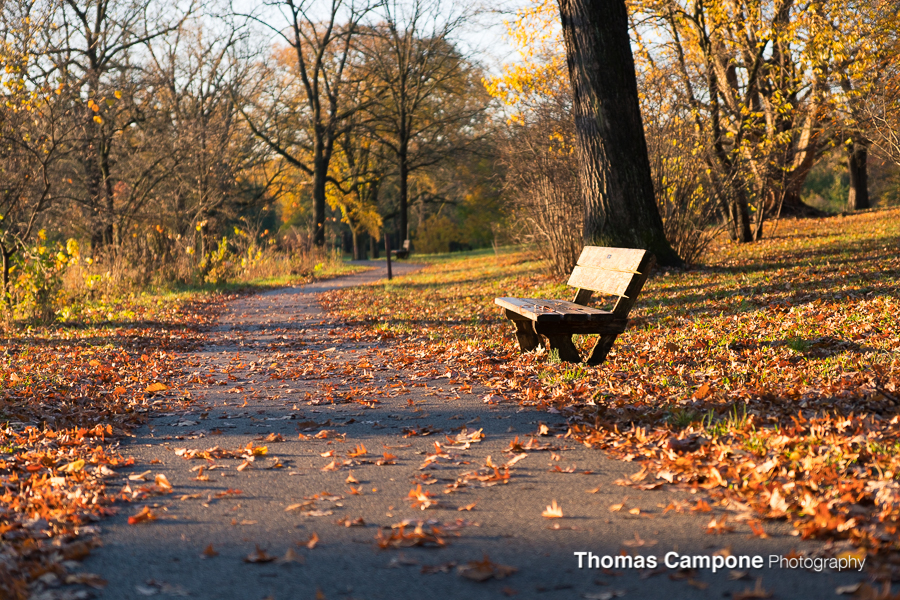
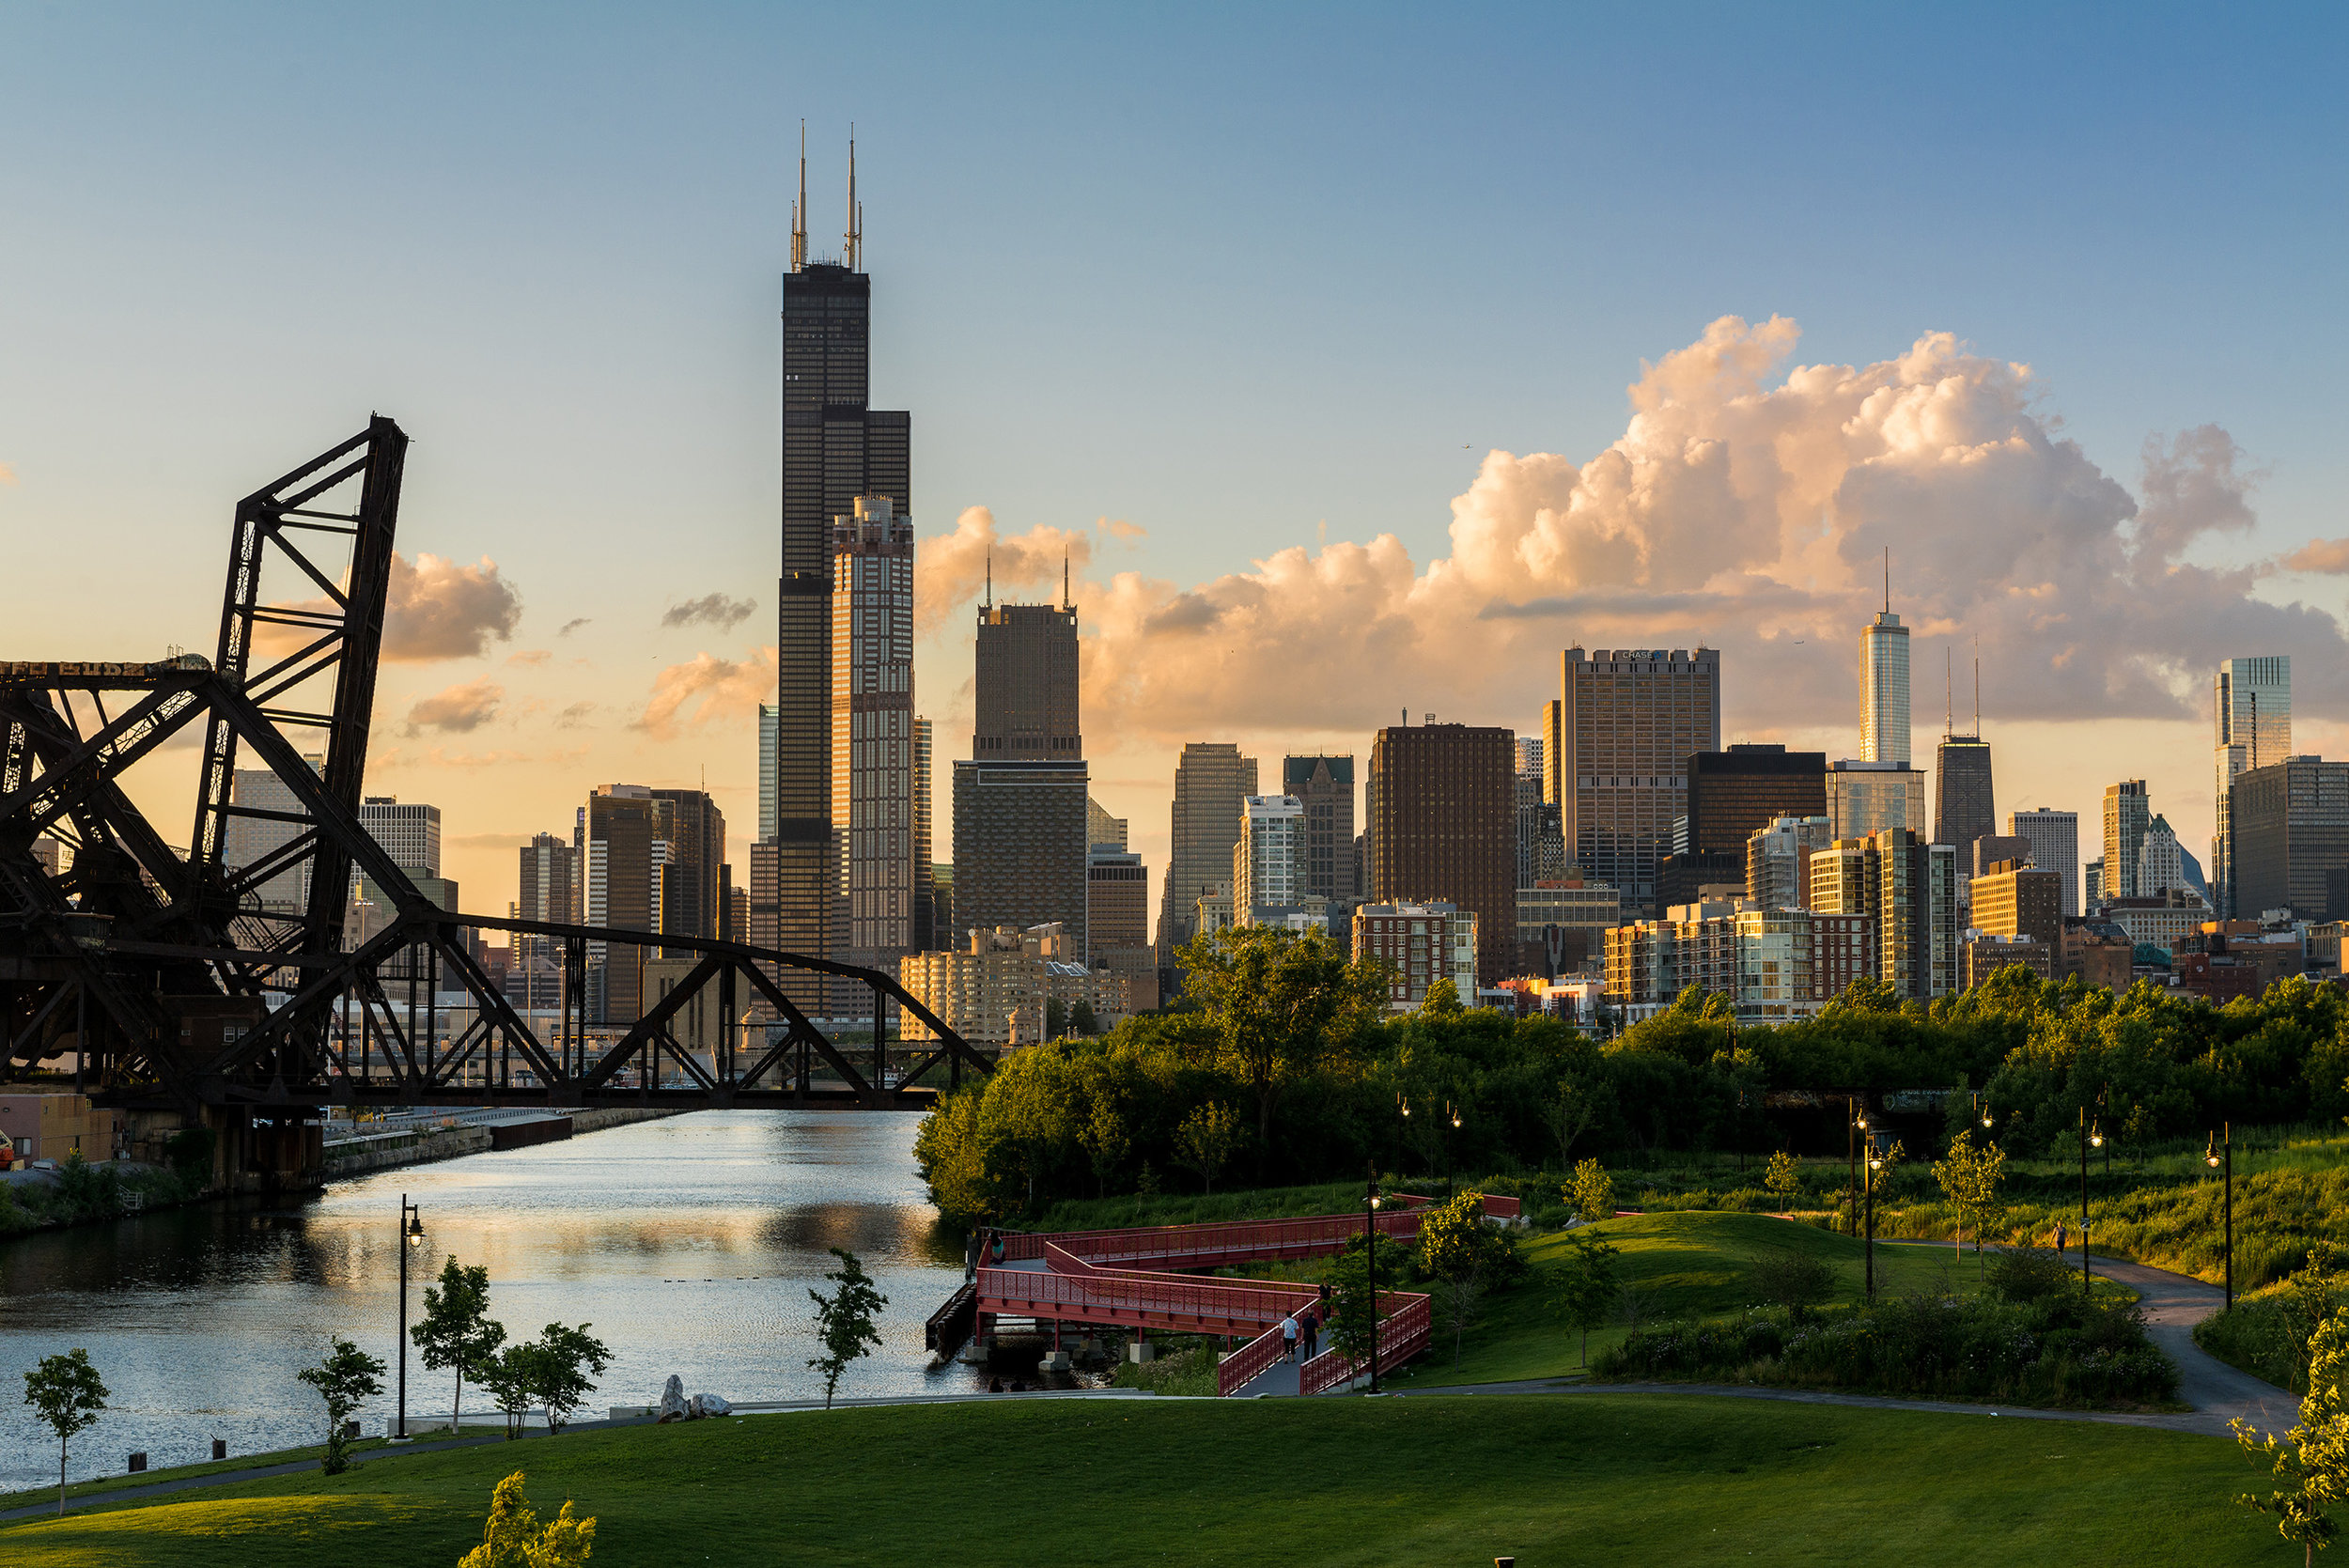
The south side of Chicago provides arguably the best views of the Chicago skyline. 18th Street is littered with these picturesque photo ops. Between Clark Street and Canal Street is a raised bridge that provided the view in the image above. There are also good vantage points further west toward Canal Street which shows the train tracks leading toward the Willis Tower. This half-mile of road is worth exploring and the park in the foreground of the shot above is Ping Tom park which is also worth exploring.

Screenshot 2018-08-17 21.33.04.png

How to get the Shot

This photo was taken on the 18th Street bridge between Clark Street and Canal Street. I took this shot about an hour before sunset while some large cumulus clouds rolled through the city. From this vantage point you can see the 3 brother towers of Chicago (Willis, Trump, Hancock) and the rest of the skyline. This shot was taken on my 28-70mm f2.8 lens. I shot this particular photo at 62mm. This focal length was chosen to help “flatten” the image and make the bridge look closer to the buildings in the background. I also took the shot at this length because it provided the best framing for the image.


Editing the Shot

One of the nice features of shooting digital is how much flexibility you have in editing your photos. I still carry some neutral density filters in my bag but I find I use them less frequently than before due to the dynamic range I have with my Nikon D800 and the ability to bring back detail in Adobe Lightroom. 

My edit for the photo above consists of a neutral density (equivalent) filter being applied in Lightroom and a few tweaks to the “Basic” and “HSL” tabs. Let’s start with the filter first.

Screenshot 2018-08-17 21.34.55.png

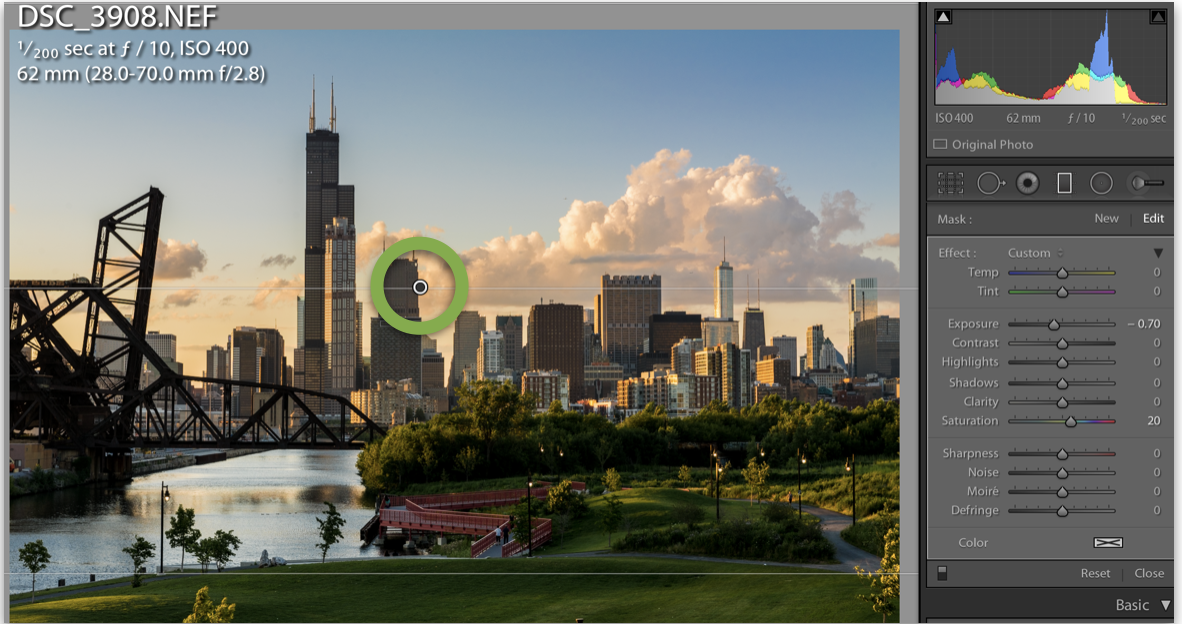
Above you can see that I used the graduated filter tool on the upper right and held the shift key while pulling down from the top of the photo. This tells Lightroom to make sure that the filter is straight. Once I had the filter where I wanted it I reduced the exposure of the sky. Most of the time when you shoot at sunrise or sunset you will have much different light from the foreground of your image to your background. By reducing the exposure of the sky I get more consistent light throughout the image and what I consider a more appealing photo. After I reduced the exposure I also added a touch of saturation to the sky which brought out the blues and the orange in the clouds.

Screenshot 2018-08-17 21.36.08.png

After adjusting the graduated filter I moved on to the “Basic” panel. For most of my photos, I like to bump up the vibrance and clarity sliders. This photo was no exception. I moved the vibrance up to +15 and the clarity up to +35. Due to the lighting, I felt that the exposure needed to come up slightly. With the exposure increase, I decided to bring down the highlights which impacted the sky and brought the exposure more in line with the foreground. For my latest photos I’ve started using the command key while increasing/decreasing my blacks slider. This replaces your photo with a clipping mask. As you move the slider more of the image is shown as black pixels. What this shows you are the sections of the image that are absolute black and that have lost detail because they are too dark. I like to have some of the image as absolute dark because I believe it adds to the richness of the photo. This slide also works with the white slider.

Screenshot 2018-08-17 21.36.40.png
Screenshot 2018-08-17 21.37.15.png

When I was finished with the “Basic” panel I   moved on to the “HSL” panel. The sunset that I saw when taking this photo was nothing compared to what came out of the camera so I wanted to add back some of the oranges and reds to replicate what I saw that day. To do this I used the “target” looking circle in the upper left portion of the screen shot to select the color I wanted to increase / decrease. Once you have clicked the color on your image you can click and drag your mouse right to increase the saturation of that color or drag your mouse left to decrease the saturation.  In the case of this photo, I picked the clouds and the orange in the sky to put more color back into my shot.


Other Tips

Pick the best light for this photo. I had the luxury of catching this shot during sunset with great clouds moving through the city but I’ve taken this shot a half dozen other times with bad light and no clouds. A good sunset or sunrise and clouds make the world of difference in this shot. If you have the luxury of time, keep an eye on the cloud formations an hour or two before sunset and head out when you think the sunset will be special.


How to Get There

This particular area is perfectly in-between two El stops so it’s not as easy to get to as some other locations. I would suggest taking the number 29 bus (State Street) if you have access to it. Get off on 18th Street and walk west a couple of blocks and you will be at the foot of the bridge. If you need to get down to the area in a hurry hop in a cab. Your cab fare should be less than $10 from the Loop.


How to Support My Site

I love my photography and giving back to the community. If you like this site and want to support it I would greatly appreciate using the links to purchase any of the products in my posts. I also sell as well as a book "The Photographer's Guide to Capturing Chicago".If you want an easier way to replicate the shots in this post please consider purchasing my Lightroom presets using the link below. Thanks for stopping by and supporting my work!

Lightroom Presets

The Photographer's Guide to Capturing Chicago

Buy Now
tags: Chicago
categories: Chicago
Monday 10.01.18
Posted by Thomas Campone
 

The Second City

16mm - f11 - 1/60 sec -  ISO 200

16mm - f11 - 1/60 sec -  ISO 200

Chicago is filled with hidden gems noticed by only a select few that walk and pay attention to the city. This location is one of those hidden gems. There are only a number of El stations that have a crossing over the tracks and this happens to be one with a great view. The building at the end of the tracks is Trump Tower and the symmetry of the tracks and the platforms lead your eye directly to the building.


How to get the Shot

This shot was taken on the Madison and Wabash “El” platform in the Chicago loop. This particular station has a bridge that crosses over the tracks to connect the two platforms. It is from this perspective that you can see directly north down the tracks toward the Trump Tower.  I shot this photo with the Tokina 11-16mm lens. This particular image was shot a 16mm. The wide-angle lens helps to exaggerate the leading lines of the platform and the tracks. This image is a high dynamic range (HDR) shot that I then used Silver Efex Pro 2 to turn into a black and white image.


Editing the Shot

Screenshot 2018-08-17 21.26.33.png

 After you have shot your bracketed photos open Photomatix and import the images. I used the settings to the right to create an image with a ton of contrast and “grit”. Grit is what I call the micro detail that is brought out when using the HDR technique. When you pair this detail with the Silver Efex Pro High Structure (harsh) settings you get an incredible amount of detail and you create images that people can’t seem to look away from. 

The original HDR photo before the B&W conversion

The original HDR photo before the B&W conversion


Other Tips

Don’t go during peak hours. The Chicago Transit Authority has a no tripod policy so if you avoid crowds you will be better off. If you want to shoot this shot with a tripod go on a Saturday or Sunday morning when the crowds are sparse. Once you get to your spot shoot quickly. You may or may not get bothered by the CTA about your tripod but plan on setting up and shooting quickly. There is nothing illegal about shooting with a tripod but once you are asked to put it away it may be best to stop shooting with it.


How to Get There

Getting to the train station is pretty easy considering it is right on the El tracks. This station sits on the Brown, Pink, Green, Purple and Orange lines. You can take any of these train lines toward the loop and you should arrive at the Madison station within 20-25 minutes from most areas within the city.


How to Support My Site

I love my photography and giving back to the community. If you like this site and want to support it I would greatly appreciate using the links to purchase any of the products in my posts. I also sell as well as a book "The Photographer's Guide to Capturing Chicago".If you want an easier way to replicate the shots in this post please consider purchasing my Lightroom presets using the link below. Thanks for stopping by and supporting my work!

Lightroom Presets

The Photographer's Guide to Capturing Chicago

tags: Chicago
categories: Chicago
Monday 09.24.18
Posted by Thomas Campone
 

Storm in the City

28mm - f4.0 - 5 sec -  ISO 160

28mm - f4.0 - 5 sec -  ISO 160

Chicago is home to some incredible spring and summer storms. Since the geography is flat there is nothing to impede the storms as they roll over the city and on to Lake Michigan. Also the skyscrapers that form downtown act as huge lightning rods that entice the storms to strike multiple buildings as they pass. As you can see from the photo above, this can create some stunning results.


How to get the Shot

The key to this shot is getting to a high location with close access to a window or a covered area. This location happened to be the balcony of a friend’s condo. However, there are many other locations in Chicago that are public that will give you a great view of a passing storm. I’ve been trying to get up to the Hancock observatory during one of these powerful storms. From this view, you will be able to see the Aon Building, the Willis Tower, and theTrump Tower. You can also try to access the Willis Tower but I don’t believe that the views are as good as the John Hancock building. I also highly suggest trying to get to Rush Memorial Hospital’s parking garage. If you go to the second floor from the top you will have a great view of the city with protection from the lighting. Just before a summer storm, I arrived at Rush’s garage only to find another photographer shooting a time-lapse video. Apparently, I wasn’t the only photographer with this idea. 

Since the storms usually blow in from the west, it is best to go west of the city and shoot as the storms roll over and pass the city. The shot above was captured after waiting almost 3 hours and shooting more than 400 photos. 

The ideal exposure length for lightning is around 5 seconds. At this shutter speed, you should get bright crisp images that capture the strikes. Set your ISO as low as possible and set your camera to shutter priority mode. The aperture for theses shots shouldn’t matter too much considering you will be focusing on a building or object that is far away so the depth of field shouldn’t pose an issue. If you have a shutter release with a lock use it. This will keep your camera shooting images back to back. For the photo above I put a disposable rain sleeve on my camera and locked the shutter release so that the camera would continually take 5 second exposures. This allowed me to capture the image above while enjoying the storm from inside.

OP/Tech Rainsleeve


Editing the Shot

Lightning photos are very fun to shoot and edit. The shot above is a combination of 3 photos placed on top of one another. When shooting lightning sometimes you will get a perfect and interesting strike and sometimes you will need to blend multiple shots together to get the desired result. 

Screenshot 2018-08-17 21.20.01.png
Screenshot 2018-08-17 21.20.33.png

To blend multiple photos together you will need Adobe Photoshop. First, start by opening all the photos in photoshop. Choose the rectangular marquee tool and press Command-A (select all). This will select the entire image. Copy this photo and paste it on the first photo. Repeat this step for all the photos you want to blend together. Once you have all the photos on one document you can change the blend mode to have just the lightning blend through the layers. I normally use the “Lighten” blend mode to do this. From there you can tweak the white balance, contrast and vibrance to get the desired final result.


Other Tips

Set you camera to shutter priority mode and set the shutter time to 4-6 seconds. This should allow you to capture the details of each lightning strike. If you have access to a shutter release use it and lock the release in place so that the camera keeps taking photos. Also set the focus point and turn off the auto focus. This will keep the focus consistent so that you can layer multiple exposure together if needed. And since it will most likely be raining during your shoot, pick up a 2 pack of OP/TECH USA Rainsleeves. You can pick up a pack of two on Amazon for $6.50. For my last shoot I was able to leave my camera outside in the rain with one of the OP/TECH Rainsleeves on my camera. My only suggestion is that if you use the OP/TECH rain sleeve is that you pick up a rubber band to secure the sleeve to your camera lens. It has a drawstring but it doesn’t stay as tight as I would like.


How to Get There

This depends highly on which location you decide to shoot from. I suggest that you start in the John Hancock observatory. The first reason is that you can see both the Willis Tower and the Trump Tower. Both of these buildings act as major lighting rods during storms so there is a good chance that you will get a strike on one or both of these buildings during a storm. The other reason you should shoot from the John Hancock is that you have a direct view of Lake Michigan and the North shore of Chicago. During storms the strikes over Lake Michigan and the north shore are stunning. 

Given the weather conditions, consider taking a cab if you are going to shoot at the John Hancock and consider driving if you are going to Rush Memorial. Both are great options during a storm but the John Hancock is most likely the quickest to get to.


How to Support My Site

I love my photography and giving back to the community. If you like this site and want to support it I would greatly appreciate using the links to purchase any of the products in my posts. I also sell as well as a book "The Photographer's Guide to Capturing Chicago".If you want an easier way to replicate the shots in this post please consider purchasing my Lightroom presets using the link below. Thanks for stopping by and supporting my work!

Lightroom Presets

The Photographer's Guide to Capturing Chicago

tags: Chicago
categories: Chicago
Thursday 09.13.18
Posted by Thomas Campone
 

The Photographer's Guide to Capturing Chicago - Streaks of El

18mm - f22 - 13 sec -  ISO 320

18mm - f22 - 13 sec -  ISO 320

The Chicago train system has been a fascination of mine since I first moved to the city. Both the subways and the elevated trains provide this energy about the city. Everything from the the interesting shadows and structures that fall beneath the elevated tracks to the subway system and the tracks themselves can inspire images. I believe that you could build a portfolio of just photos of Chicago’s transit system.


How to Get the Shot

This image was taken on the Quincy/Wells Brown, Purple and Orange line stop in the early fall. I  shot this photo from the platform with my camera set up on a tripod.  I framed the shot and fired off 3 bracketed exposures to capture the buildings.  Then I waited for the train to come so I could capture it in a separate exposure.  The Chicago Transit Authority (CTA) normally won’t let you shoot with a tripod but for some reason I was able to get away with it for a few minutes.  Once the train came down the tracks I shot a 13.0 second exposure to capture the blurred train and its streaking lights.


Editing the Shot

When I got the photos on my computer the first thing I did was convert my bracketed photos into an High Dynamic Range (HDR) image.  For this particular image I wanted to minimize the HDR  “look” and use the 3 exposures to make the final image look realistic with just more detail in the buildings and in the shadows. I did this by tweaking my settings especially the “Lighting Adjustments” slider. Lightning Adjustments in Photomatix effect the how light is distributed throughout the image. If you move the slider to the right you will get a realistic effect. As you move it further to the left it distributes light from areas that were bright in the original image to the shadows and low light areas. This slider is the main reason that you see some HDR images that don’t match with how your brain processes the world around us. Sometimes it makes for a great effect but for this particular  image, I wanted to avoid this style. 

Screenshot 2018-07-07 21.58.08.png
Screenshot 2018-07-07 21.58.37.png

Next, I layered in the lights and train using photoshop.  Once the train image was brought into it’s own layer, I aligned the images using the Auto-Align Layers function in Adobe Photoshop .  This can be found in the edit menu.  It does a great job of making sure that all of your layers are aligned correctly without having to manually align them.

Next I flipped through the blending modes in the tools pallet to find a blending mode that made the lights of the train come through to the background image. The section of the list that starts with “Lighten” will allow the lighter parts of the image to come through and the section that starts with “Darken” will allow the darker parts of the image to come through.  I ended up using the “Dissolve” blending mode which got me 80% to the result I wanted. To finish the effect I grabbed the paintbrush tool and painted the rest of the light trails using a layer mask. 

Screenshot 2018-07-07 21.59.05.png

Other Tips

You can try to shoot on the platform with a tripod without the CTA’s permission but more times than not you will be asked to put away your tripod.  I’ve gotten lucky a few times but if you only have a weekend in Chicago you may not want to risk the shot.  If you go to the CTA’s website you can call to get approval to use your tripod.  See the link below for more information.

http://www.transitchicago.com/business/photopolicy.aspx

The other option is to bring a small tripod such as a GorillaPod or something similar. These small tripods are much smaller than regular sized tripods and if you attach it to a railing or such you may have better luck using it on the platform. 


How to Get There

Technically you can shoot this shot at any El stop but the stop that I took this photo and the surrounding loop stops have good vantage points of buildings which help create the urban feel of the photo.  To get to this particular station, you can take the Brown or Orange line to the Quincy/Wells stop. This stop is on the Southwestern side of the loop.  Either the Brown or Orange line should get you to the stop in a relatively short time.  If you need to take the Red line you can get off at the Jackson stop and walk 3 blocks west. 


How to Support My Site

I love my photography and giving back to the community. If you like this site and want to support it I would greatly appreciate using the links to purchase any of the products in my posts. I also sell as well as a book "The Photographer's Guide to Capturing Chicago".If you want an easier way to replicate the shots in this post please consider purchasing my Lightroom presets using the link below. Thanks for stopping by and supporting my work!

Lightroom Presets

The Photographer's Guide to Capturing Chicago

tags: Chicago
categories: Chicago
Monday 08.20.18
Posted by Thomas Campone
 

Drone Over Chicago's Grant Park

Drones are pretty amazing little tools. They can fly for miles, shoot 4k video and shoot raw images. I've been shooting some random B roll of Chicago and thought I would put together a little video to share with everyone. I expect to do more of these little videos in the upcoming months. Enjoy!

tags: Chicago, Drone, DJI, DJI Mavic Air
categories: Chicago
Saturday 08.18.18
Posted by Thomas Campone
 

Morton Aboretum

Every year I find myself returning to Morton Aboretum inevitably in the fall. There aren't a lot of areas to hike around Chicago and in the fall I find it nice to spend a few hours in nature walking and talking with a good friend. It always helps if they are a photographer too. This time I had the pleasure of spending time with one of my budding photographer friends Alex.

Las-Vegas-1.jpg
Las-Vegas-2.jpg

Alex and I spent almost 3 hours walking, talking and trying to capture some morning light in the Aboretum. It was perfect timing because the trees were already shedding their leaves and many  were covered with red and orange leaves.

We got there around 7 am so we had over an hour with nice soft light. It was a relaxing and fun time out with a great old friend. I look forward to my next adventure with him and my camera. 

tags: Morton Aboretum, Chicago, Nature
categories: Chicago
Tuesday 02.14.17
Posted by Thomas Campone
 

Surprise Engagement!

Surprise engagement shoots are a lot of fun because of the energy and excitement of the soon to be engaged couple. I had the pleasure of shooting the engagement of Vince and Aarti in the fall. 

The setting was classic; Millennium Park. Their closest friends were invited and the weather couldn't have been better. Since it was a public venue, I was able to blend into the surroundings as if I was just another photographer in the park.

September Surprise Engagement-2.jpg
September Surprise Engagement-3.jpg
September Surprise Engagement-4.jpg

As the moment approached I could tell Vince was excited and a little nervous. He had a box on a bench waiting for her with a card and a fake ring box. She was sent on a scavenger hunt all day so she was looking for the next clue when she came upon the box. 

September Surprise Engagement-5.jpg
September Surprise Engagement-9.jpg

Vince was hiding around the corner and after she had a chance to read everything he came out and got down on one knee. It was a magical moment and one I was glad to capture for them. Of course she said yes and is now soon to be a Mrs. 

September Surprise Engagement-11.jpg
September Surprise Engagement-12.jpg

If you or your friends are getting engaged and would like to capture the moment, give me a call and let's talk through the details. I'd love to help make your day that much more magical.

September Surprise Engagement-13.jpg
September Surprise Engagement-14.jpg
September Surprise Engagement-16.jpg
September Surprise Engagement-17.jpg
September Surprise Engagement-18.jpg
September Surprise Engagement-19.jpg
September Surprise Engagement-21.jpg
September Surprise Engagement-22.jpg
September Surprise Engagement-23.jpg
September Surprise Engagement-24.jpg
tags: Egagement, Wedding, Chicago, Millenium Park
categories: Chicago
Tuesday 02.14.17
Posted by Thomas Campone
 

Street Photography with an 85mm Lens

For a long time I shot with zoom lenses. The good ones are versatile, easy to shoot with, you can zoom without moving and numerous other reasons. But more recently I've switched to all prime lenses and I'm loving it. 

A prime lens is a fixed length lens. It does not zoom at all unlike many other types of lenses (including your iPhone). The advantage of prime lenses is that they are lighter, faster (lower f-stop) and are sharper than zoom lenses. The other factor I love about only owning zoom lenses is that they force me to be more creative. 

On this particular shoot I decided to leave the house with nothing but an 85mm Zeiss Batis 1.8 to shoot street photography. 85mm is traditionally a portrait lens so this was a challenge. What I found by bringing only one prime lens with me was that my brain shifted and I started thinking about the types of shots I could create. 

The limitations of the lens actually helped me to think more creatively instead of zooming out and shooting a shot wide or using my zoom to get in close. It actually limited what I could do therefore made me think harder on the types of shots I could achieve and how to execute those shots. 

Buy Now - $4.99

I find that since I've moved to all prime lenses I'm having more fun shooting and my abilities are growing by leaps and bounds. I also am in love with the Zeiss lenses I've bought. I never really believed that Zeiss had a look until I started shooting with them. I hate to say it but now I'm a believer.

tags: Chicago, Street Photography, Zeiss, Batis
categories: Chicago
Friday 01.20.17
Posted by Thomas Campone
 

Brookfield Zoo

I've lived in Chicago for a very long time and for some reason I've never been over to Brookfield Zoo. It may have been because Lincoln Park Zoo is free and it has always given me my zoo fix or it may have been that I didn't have kids and didn't need something to keep them engaged 24/7. Either way, over the summer I spent some time at Brookfield Zoo and was very impressed with the attractions and the animals they have.

Brookfield Zoo-1.jpg
Brookfield Zoo-2.jpg


The longest lens currently in my bag is a manual focus 135mm f2.0 lens. It's great for portraits but it was a little short for zoo animals. Luckily I have enough resolution on my camera to crop in without loosing too much detail. I would love to buy a 300mm lens to shoot animals and sports but I don't shoot those subjects too often right now. One day I will definitely take the plunge. In the meantime enjoy the shots from the zoo. 

Brookfield Zoo-7.jpg
Brookfield Zoo-3.jpg
Brookfield Zoo-5.jpg
Brookfield Zoo-9.jpg
Brookfield Zoo-10.jpg
Brookfield Zoo-11.jpg
tags: Chicago, Brookfield Zoo, Zoo
categories: Chicago
Thursday 01.12.17
Posted by Thomas Campone
 

Chicago Botanic Gardens

The Chicago Botanic Garden is a hidden gem on the north side of the city. It's a 385 acre plant sanctuary that is brimming with life all year round. The garden is a favorite place of mine that I like to visit yearly. Each visit is very different and I like to explore a different part of the park. They have everything from vegetable gardens to bonsai trees. I love how they plant the vegetation in patterns so that it's as much an art installation as it is a botanic garden. 

Chicago-Botanic-Garde-1.jpg
Chicago-Botanic-Garde-2.jpg
Chicago-Botanic-Garde-3.jpg
Chicago-Botanic-Garde-4.jpg
Chicago-Botanic-Garde-1.jpg Chicago-Botanic-Garde-2.jpg Chicago-Botanic-Garde-3.jpg Chicago-Botanic-Garde-4.jpg

On my recent trip they had a bonsai exhibit on display that was very interesting. I've dabbled in the art of bonsai growing in my past so I was very impressed seeing all the mature bonsai trees. The park is worth a visit at least once a year just to relax and stroll through the park. They also have a photography society that meets once a month to explore the garden. 

http://www.chicagobotanic.org/photography/garden_photo_society

Chicago-Botanic-Garde-7.jpg
Chicago-Botanic-Garde-8.jpg
Chicago-Botanic-Garde-9.jpg
Chicago-Botanic-Garde-10.jpg
Chicago-Botanic-Garde-7.jpg Chicago-Botanic-Garde-8.jpg Chicago-Botanic-Garde-9.jpg Chicago-Botanic-Garde-10.jpg
tags: Chicago Botanic Garden, Chicago, Flowers
categories: Chicago
Wednesday 12.14.16
Posted by Thomas Campone
 
Newer / Older

Powered by Squarespace.