• Portfolio
  • Contact
  • Blog
  • Shop

Thomas Campone Photography

Chicago based travel photographer

  • Portfolio
  • Contact
  • Blog
  • Shop

The Photographer's Guide To Capturing Chicago - Birds Eye View of Chicago

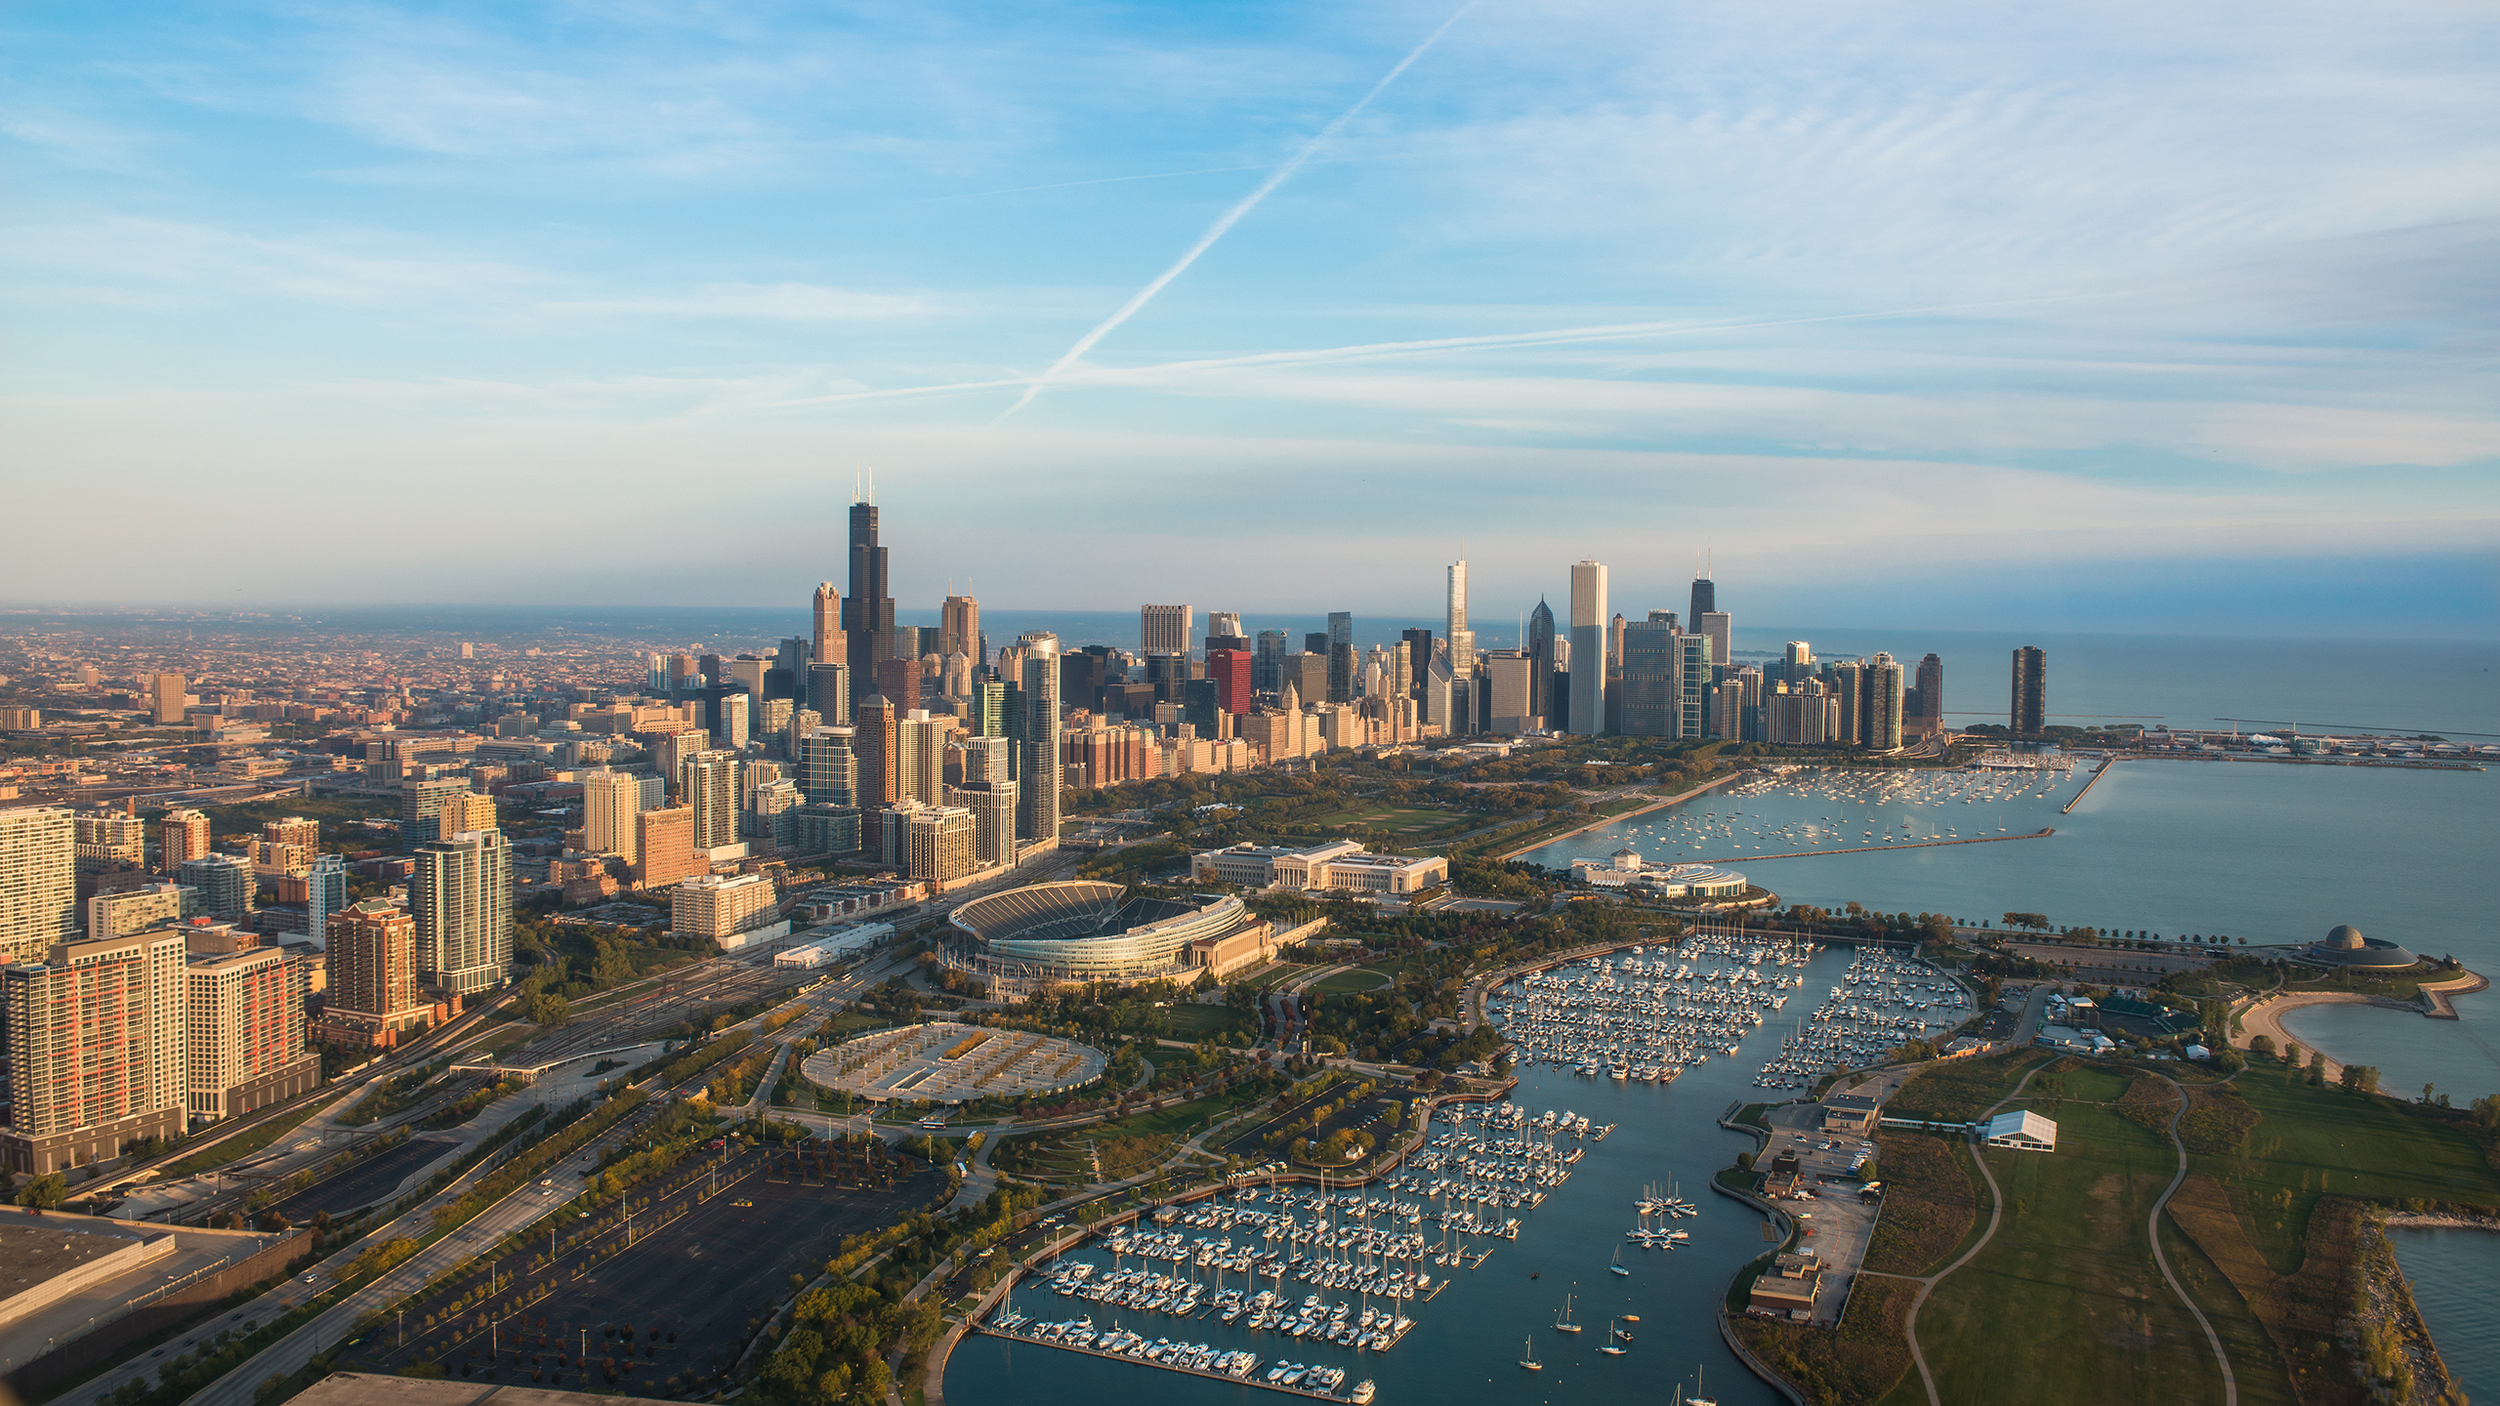
“Birds Eye View of Chicago” was taken from a helicopter at sunrise over Northerly Island, just South of downtown Chicago. The south side of the city offers a breathtaking view of Chicago especially when seen from a helicopter. Chicago Helicopter Express offers private flights from Midway Airport, which is about 10 miles from downtown and easy to access by public transit.  They also recently started offering flights from the near south side of the city.


How to Get the Shot 

If you are shooting from a moving helicopter, you have to make sure that you have the correct settings before you take off. Otherwise you might come home with a memory card full of blurry images. If you have a 24-70 f2.8 or a similar lens I would consider bringing that lens. Long lenses (100+ mm) are great but you will probably want to capture some scale with your images and a mid range zoom will help you get capture the scale of the city and buildings.

During this particular shoot I brought 2 camera bodies with me. One body had my 28-70 f2.8 lens and the other body had a 80-200 f2.8. I ended up using the 80-200 f2.8 much less than the wider lens.

If you schedule your ride at sunrise or sunset, the light will constantly change. For this reason I would consider setting up your camera before you take off. You will need to shoot with a shutter speed of 1/250 second or faster to make sure your photos are in focus, but I would consider a shutter speed of 1/500 if you can achieve it with the limited light. I got lucky with the photo above at 1/200 but I had some blurry shots even at 1/500 so if you have enough light to shoot at an even faster shutter, I suggest you do so.

It is difficult to balance the ISO and Aperture with a limited time to capture your shot. While in the air, consider shooting with a more open aperture for two reasons:

  1.   You need the light for a faster shutter speed (target 1/500 sec or faster)

  2.   If you are shooting through a window, you will be less likely to pick up any dirt or scratches

Depending on the lighting, I try to aim for no less than f5.6 so that I can get decent depth of field. Even at this aperture I had to shoot with an ISO of over 1000 to achieve my target shutter speed. On most modern cameras this won’t be an issue, but make sure you set your camera to manual mode or aperture priority before you get in the helicopter. You can also shoot with auto ISO turned on which will automatically change the ISO to achieve the shutter speed you want. If you set up your camera before you leave, you can focus on the shots you want when you are in the air. 

Editing the Shot 

There wasn’t much I needed to do to make this shot look great. I used the Basic Lightroom panel to make a few additional changes which are shown to the right. I also increased the sharpening significantly for this image. In this case the image was clean and the lines of the buildings looked much better with the increased sharpening setting.

The shot really speaks for itself and very little additional editing was done. I did need to take out a some minor glare that was from the window of the helicopter. This was accomplished in Photoshop with a few quick steps using the levels adjustment layer. 

Other Tips 

If you opt to take the helicopter tour I suggest you opt for one hour or less. Once you take off from Midway you will only be 5 minutes from downtown. If you opt for the one hour flight you will have plenty of time to capture everything from the University of Chicago on the south side to Wrigley field on the north side. You probably can get away with a 30 minute or 45 minute tour.

I’ve included a map of some of the locations I would recommend shooting from during your helicopter tour. Remember that the sun rises over the lake, so you will get better views from the east side of the city during early morning hours and from the west side during sunset.

If you decide not to spring for a helicopter tour, I would highly suggest getting up early one day and spending a sunrise at the Adler Planetarium. This location has one of the best views of Chicago on land, especially at sunrise or night. Below is one of my photos from this location during one of the many summer firework sessions. 


How to Get There 

Most helicopter tours leave from Midway Airport. From the city you can take the Orange line all the way to the end of the line (follow the Midway signs) or you can take a cab. A cab ride from downtown will cost you between $25 - $30 and it will take you 25 minutes with no traffic. Chicago Helicopter Express' new location is about 3 miles south of downtown and is a quick cab ride from most locations. 

If you decide to ride the “El” it should take about 30 minutes to get to the airport from downtown. Just hop on the closest Orange line train and take it to the end of the line. The trains run less frequently on the weekend but the ride is only a handful of stops from downtown.

I personally prefer to take public transportation if possible but if you are shooting at sunrise it may make sense to take a cab to the airport and take the train back to the city. 

The Photographer's Guide To Capturing Chicago

This post is part of an eBook I wrote about the best places to photograph Chicago. If you enjoy this post consider buying the ebook to support my site and to get access to all the best locations in Chicago!

tags: Chicago, How To, Cityscape
categories: Chicago
Wednesday 07.01.15
Posted by Thomas Campone
 

The Photographer's Guide to Capturing Chicago - The "S" Curve

S Curve.jpg
Buy Now - $4.99

River North consists of the area just north of the heart of Chicago, bound by Michigan Avenue to the east, Chicago Avenue to the north, and the Chicago River to the south and west. Tucked behind the Merchandise Mart, it is home to some of the top restaurants in the city. The “El” is a very interesting subject to capture in general and in this location there are many different angles to capture the “El” with the city as a backdrop. This particular shot is of the “El” train moving through one of the few S curves in the city. 


How to get the Shot 

In order to capture this shot, you will need a tripod due to the long exposure. I captured this image early on a Saturday morning in the parking garage on Wells Street and Hubbard Street. This shot is actually 2 exposures combined into one using Photoshop. I shot this image with an aperture of 29 and a shutter speed of 4 seconds. Since the sun was low in the sky and behind me, I was able to capture this image without a neutral density filter. I decreased my ISO to 160 so that I could keep the shutter open longer without overexposing the image. The view of this shot is facing due West, so if you decide to try this shot in the afternoon you may have to battle a setting sun and backlit lighting conditions. Bring a neutral density filter with you because you may need it depending on the shooting conditions the day of your shoot. 

Editing the Shot 

The final image was edited in Aperture with the help of Nik’s Silver Efex Pro 2. I first converted both images to black and white using Silver Efex Pro 2. I almost always start with the “High Structure (harsh)” setting and add control points to achieve the look I’m shooting for. In this case, it was essential to darken the sky and pull out more details in the brick and buildings. I did this by adding more structure to the both images in Silver Efex Pro. This increases what I call the “grit” of an image.

I then added a touch of color by masking the light trails back into the black and white image using Photoshop. In hindsight, it may have been easier to use Silver Efex Pro to selectively bring the color back into the shot, but there are many ways to achieve this look.

After I had the two shots the way I wanted, I brought them both into Photoshop as separate layers. I used the Lighten blending mode to lay the two trains on top of one another. 


Other Tips 

On Saturday the trains run every 8-10 minutes so you may have to wait a little while to capture your image. I took multiple shots in order to achieve the right amount of blur for the final effect. Try using different shutter speeds to capture different streaks of train and light. You may find that you like longer or shorter exposures than my image.

If you want to capture images on the “El” platform you may need approval from the Chicago Transit Authority. If you shoot without a tripod, you can get away with shooting on the platform, but the minute you pull out a tripod you will most likely be “greeted” by a few CTA employees. If you are interested in obtaining a permit you can find out more information at the link below. You will have a better chance of shooting without being bothered early in the morning or on the weekend.

http://www.transitchicago.com/business/photopolicy.aspx  

The green circle on the map below is the location where the “S” Curve photo was taken. It’s a public parking lot that is free if you are traveling by foot. I looked at the view from different floors but in the end I decided to take the photo from the 4th floor. This level is just above the tracks of the “El” and provides a good vantage point to capture the image. There are open glassless windows on each floor that allow you to set up your camera even in bad weather.

The blue location on the map is another parking garage in the area that has a great vantage point of the same S curve. I’ve been to the roof of this garage but not to capture this image. This could be an interesting spot to capture a similar image from the other direction with the city 


in the background. I love to scout public parking garages for photo locations because they provide a perspective that most people don’t see or bother to explore. 

How to Get There 

Just to the left of my photo is the Merchandise Mart Brown line stop. This is the closest stop to this location. Take the Brown line if you have access to it and if you can’t get to the Brown line you can take the Red line to Grand Ave and State Street, about a six block walk. 

The Photographer's Guide to Capturing Chicago

This post is part of an eBook I wrote about the best places to photograph Chicago. If you enjoy this post consider buying the ebook to support my site and to get access to all the best locations in Chicago!

Buy Now
tags: Chicago, Elevated Train, El, How To
categories: Chicago
Monday 06.15.15
Posted by Thomas Campone
 

Powered by Squarespace.