• Portfolio
  • Contact
  • Blog
  • Shop

Thomas Campone Photography

Chicago based travel photographer

  • Portfolio
  • Contact
  • Blog
  • Shop

Storm in the City

28mm - f4.0 - 5 sec -  ISO 160

28mm - f4.0 - 5 sec -  ISO 160

Chicago is home to some incredible spring and summer storms. Since the geography is flat there is nothing to impede the storms as they roll over the city and on to Lake Michigan. Also the skyscrapers that form downtown act as huge lightning rods that entice the storms to strike multiple buildings as they pass. As you can see from the photo above, this can create some stunning results.


How to get the Shot

The key to this shot is getting to a high location with close access to a window or a covered area. This location happened to be the balcony of a friend’s condo. However, there are many other locations in Chicago that are public that will give you a great view of a passing storm. I’ve been trying to get up to the Hancock observatory during one of these powerful storms. From this view, you will be able to see the Aon Building, the Willis Tower, and theTrump Tower. You can also try to access the Willis Tower but I don’t believe that the views are as good as the John Hancock building. I also highly suggest trying to get to Rush Memorial Hospital’s parking garage. If you go to the second floor from the top you will have a great view of the city with protection from the lighting. Just before a summer storm, I arrived at Rush’s garage only to find another photographer shooting a time-lapse video. Apparently, I wasn’t the only photographer with this idea. 

Since the storms usually blow in from the west, it is best to go west of the city and shoot as the storms roll over and pass the city. The shot above was captured after waiting almost 3 hours and shooting more than 400 photos. 

The ideal exposure length for lightning is around 5 seconds. At this shutter speed, you should get bright crisp images that capture the strikes. Set your ISO as low as possible and set your camera to shutter priority mode. The aperture for theses shots shouldn’t matter too much considering you will be focusing on a building or object that is far away so the depth of field shouldn’t pose an issue. If you have a shutter release with a lock use it. This will keep your camera shooting images back to back. For the photo above I put a disposable rain sleeve on my camera and locked the shutter release so that the camera would continually take 5 second exposures. This allowed me to capture the image above while enjoying the storm from inside.

OP/Tech Rainsleeve


Editing the Shot

Lightning photos are very fun to shoot and edit. The shot above is a combination of 3 photos placed on top of one another. When shooting lightning sometimes you will get a perfect and interesting strike and sometimes you will need to blend multiple shots together to get the desired result. 

Screenshot 2018-08-17 21.20.01.png
Screenshot 2018-08-17 21.20.33.png

To blend multiple photos together you will need Adobe Photoshop. First, start by opening all the photos in photoshop. Choose the rectangular marquee tool and press Command-A (select all). This will select the entire image. Copy this photo and paste it on the first photo. Repeat this step for all the photos you want to blend together. Once you have all the photos on one document you can change the blend mode to have just the lightning blend through the layers. I normally use the “Lighten” blend mode to do this. From there you can tweak the white balance, contrast and vibrance to get the desired final result.


Other Tips

Set you camera to shutter priority mode and set the shutter time to 4-6 seconds. This should allow you to capture the details of each lightning strike. If you have access to a shutter release use it and lock the release in place so that the camera keeps taking photos. Also set the focus point and turn off the auto focus. This will keep the focus consistent so that you can layer multiple exposure together if needed. And since it will most likely be raining during your shoot, pick up a 2 pack of OP/TECH USA Rainsleeves. You can pick up a pack of two on Amazon for $6.50. For my last shoot I was able to leave my camera outside in the rain with one of the OP/TECH Rainsleeves on my camera. My only suggestion is that if you use the OP/TECH rain sleeve is that you pick up a rubber band to secure the sleeve to your camera lens. It has a drawstring but it doesn’t stay as tight as I would like.


How to Get There

This depends highly on which location you decide to shoot from. I suggest that you start in the John Hancock observatory. The first reason is that you can see both the Willis Tower and the Trump Tower. Both of these buildings act as major lighting rods during storms so there is a good chance that you will get a strike on one or both of these buildings during a storm. The other reason you should shoot from the John Hancock is that you have a direct view of Lake Michigan and the North shore of Chicago. During storms the strikes over Lake Michigan and the north shore are stunning. 

Given the weather conditions, consider taking a cab if you are going to shoot at the John Hancock and consider driving if you are going to Rush Memorial. Both are great options during a storm but the John Hancock is most likely the quickest to get to.


How to Support My Site

I love my photography and giving back to the community. If you like this site and want to support it I would greatly appreciate using the links to purchase any of the products in my posts. I also sell as well as a book "The Photographer's Guide to Capturing Chicago".If you want an easier way to replicate the shots in this post please consider purchasing my Lightroom presets using the link below. Thanks for stopping by and supporting my work!

Lightroom Presets

The Photographer's Guide to Capturing Chicago

tags: Chicago
categories: Chicago
Thursday 09.13.18
Posted by Thomas Campone
 

Wabash Bridge

45mm - f4.8 - 1/125 sec -  ISO 160

45mm - f4.8 - 1/125 sec -  ISO 160

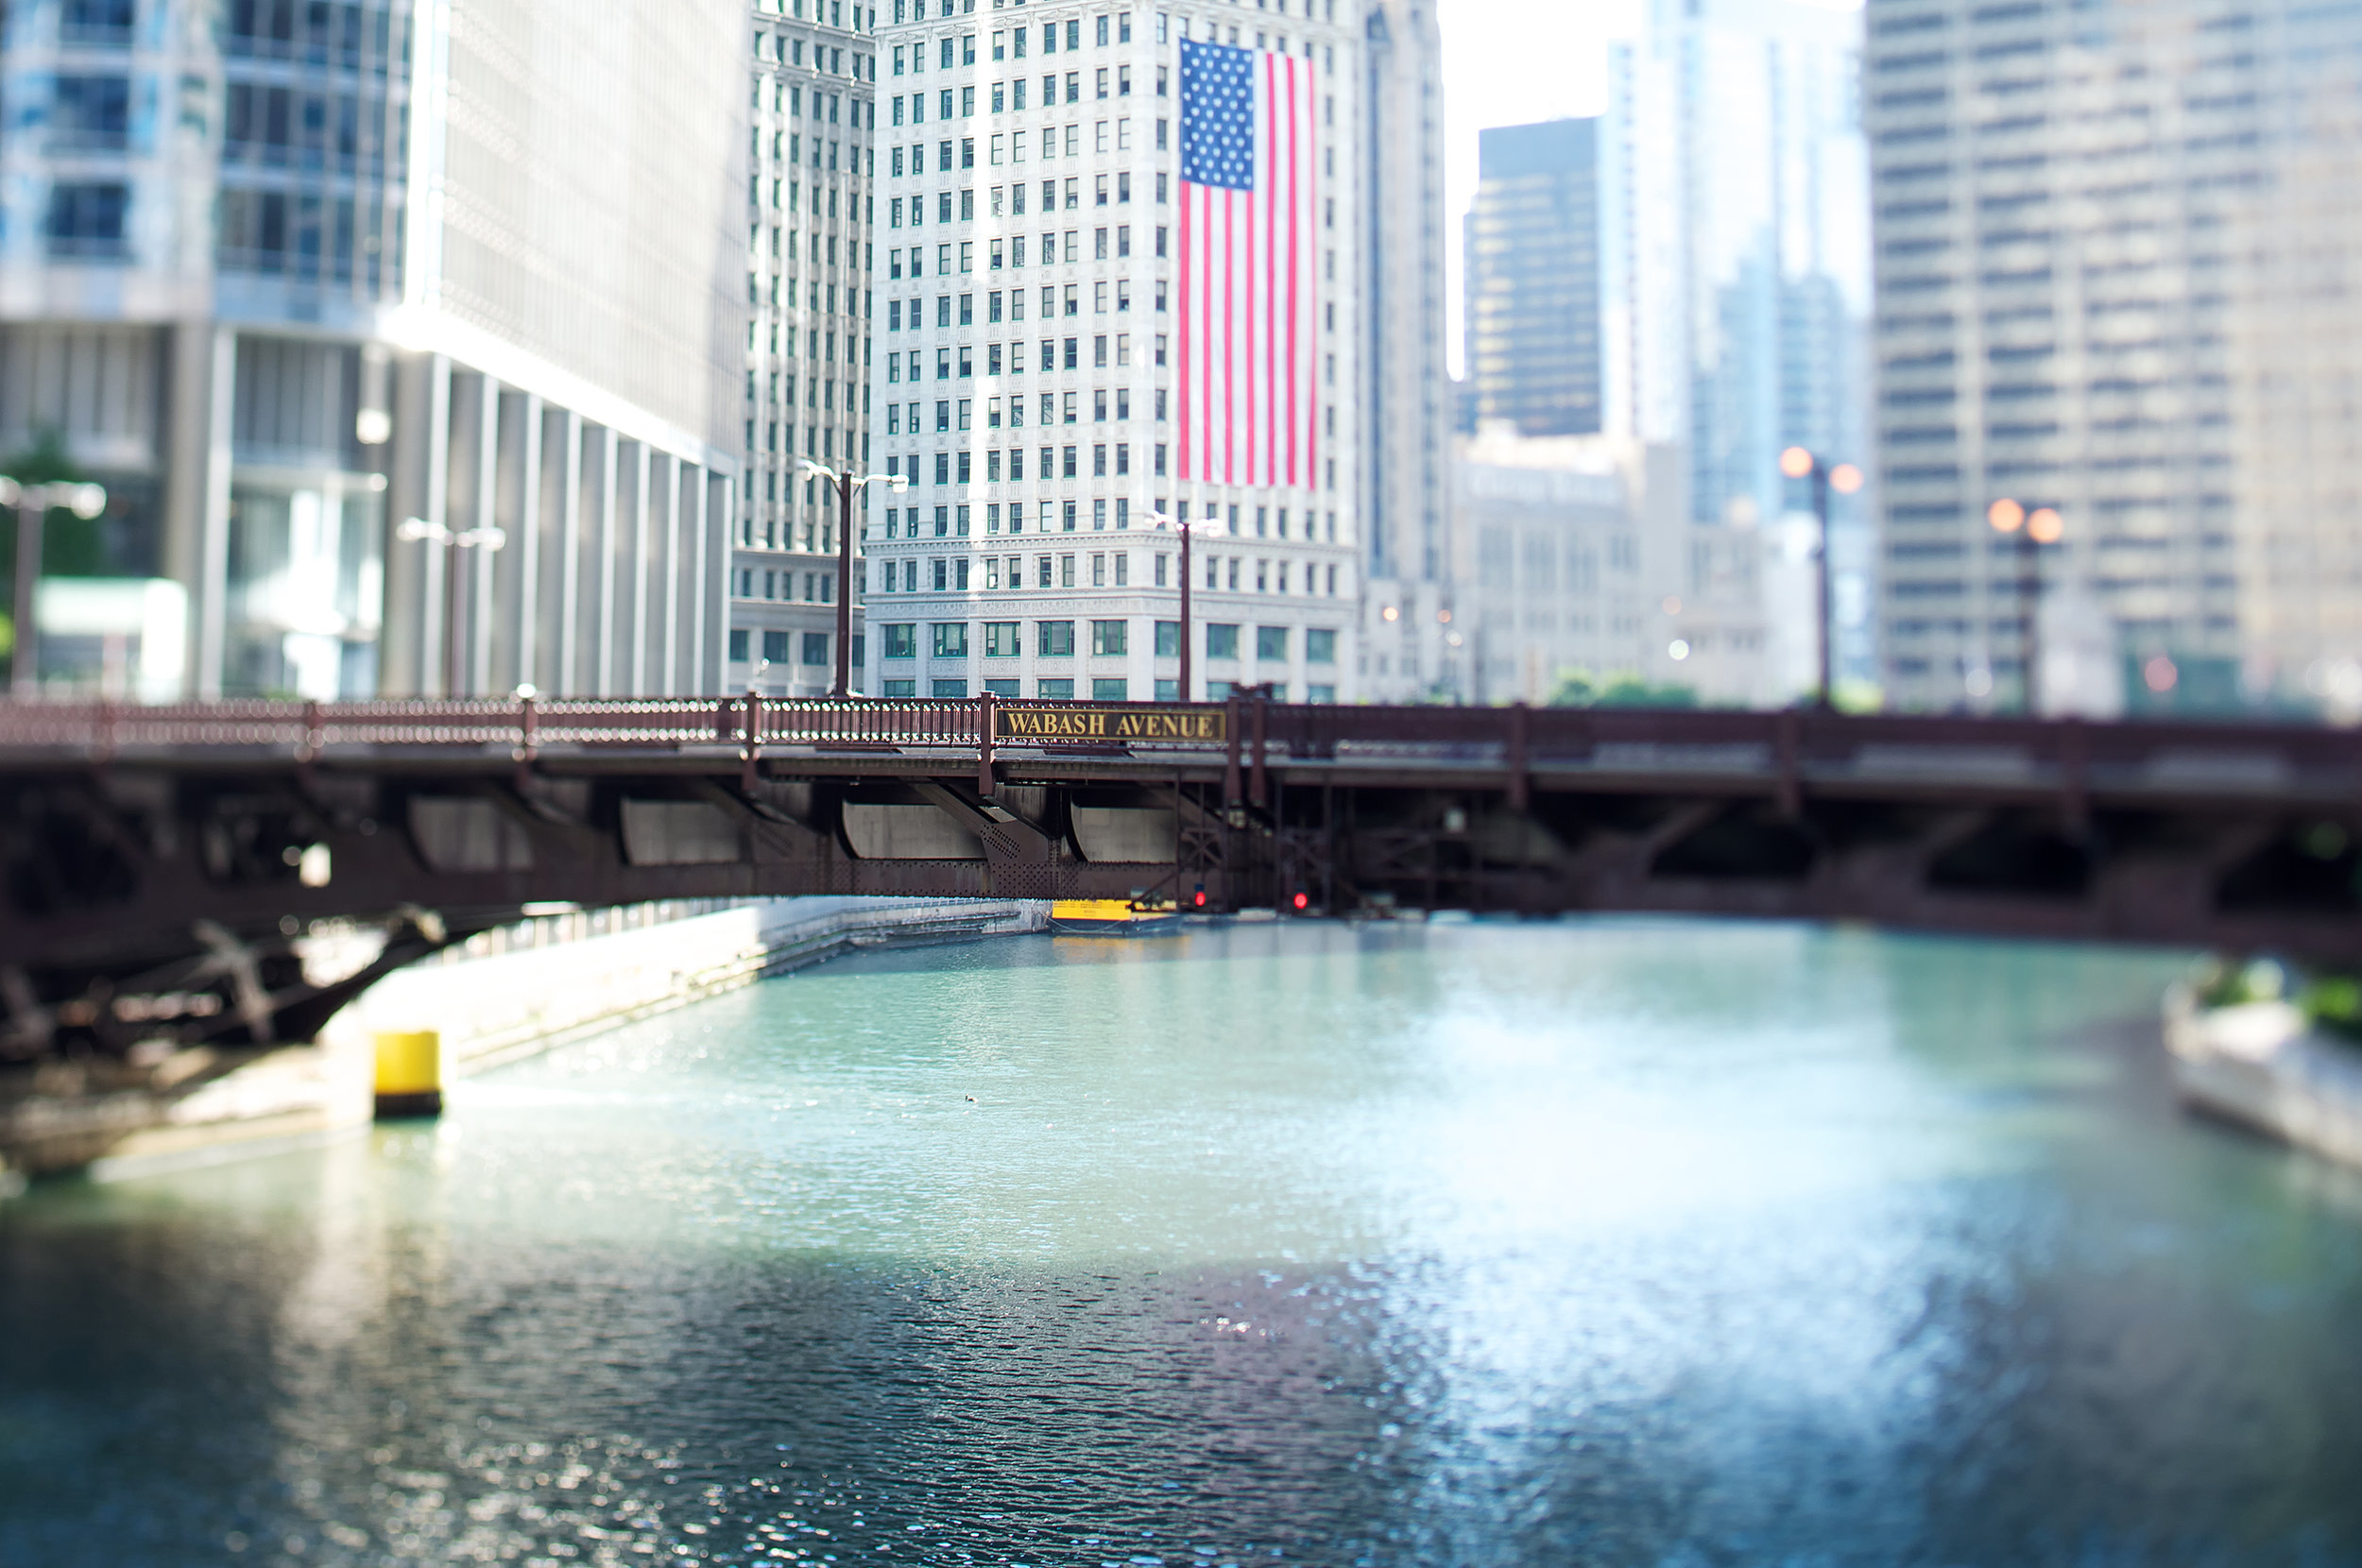
The bridges that run across the Chicago river are amazing engineering feats and a sight to be seen. There are multiple bridges and each has a unique characteristic. This particular image is of the Wabash Bridge during the Fourth of July weekend.


How to get the Shot

For this shot I rented a 60mm tilt shift lens.  Many people simulate this effect using photoshop or even Instagram but this effect was captured in camera. I captured this image from the State Street bridge on the 4th of July.  I shifted both the vertical and horizontal lens plane in order to achieve the blurred effect. This shifts the plane of focus and places the emphasis directly on the subject of the photo.  I don’t shoot with a tilt shift lens often so when I do I tend to experiment with the amount of shift to obtain the desired result.  I this particular day I was looking to shoot “miniature” Chicago but I ended up stumbling upon this scene during my shoot.


Editing the Shot

Screenshot 2018-08-17 20.53.08.png

 The image above was edited only slightly from what came out of the camera.  I did increase the contrast through the use of a tone curve and I added a few points of vibrance to increase the color saturation to match the colors I saw that morning.  Raw images tend to come out flatter than their Jpeg counterparts so I find that I almost always add vibrance and contrast to my images to reproduce the image the way my eye saw it.


Other Tips

Consider renting a tilt shift lens from a local photo store. This will give you a very unique view of Chicago and you can try to shoot with it at each location. You never know what amazing photos you might end up with.  Here in Chicago I love to use Helix Camera or borrowlenses.com.  Both have great rental departments and both are very affordable.  If you think you will use a lens often I normally suggest you buy it outright but in this case a tilt shift lens is so specialized that unless you are an architectural photographer you probably won’t use it often enough to justify a purchase. 

Wander throughout the other bridges and see what interesting shots you can get of buildings or the bridges themselves. There are a number of bridges that cross the river and each has a unique perspective. If you are going to do this start further west near Wells Street and make your way East.


How to Get There

This location is right on the Chicago river and is very easy to access.  If you take the Brown, Orange, Green, or Purple lines then you can get off at the State and Lake stop.  From there head North two blocks and you will be at the river.  If you take the Red line you can get off at the Randolph and Wabash stop.  This stop is only a half block south of the Brown, Orange, Green, and Purple line stop.


How to Support My Site

I love my photography and giving back to the community. If you like this site and want to support it I would greatly appreciate using the links to purchase any of the products in my posts. I also sell as well as a book "The Photographer's Guide to Capturing Chicago".If you want an easier way to replicate the shots in this post please consider purchasing my Lightroom presets using the link below. Thanks for stopping by and supporting my work!

Lightroom Presets

The Photographer's Guide to Capturing Chicago

tags: chicago
categories: Chicago
Thursday 09.06.18
Posted by Thomas Campone
 

Summer Sunrise and Sunset Over Chicago

50mm - f18 - 1/40 sec -  ISO 200

50mm - f18 - 1/40 sec -  ISO 200

Chicago has arguably one of the most distinguished and photographic skylines in the world. This is partially due to the geography of the area and Lake Michigan blocking development to the East. Chicago’s views are best captured from the West and the South of the city, both of which provide full views of the skyline. This particular image was taken from a few miles West of downtown.  


How to get the Shot

This shot was taken from the top of the Rush Hospital parking lot just west of Chicago.  The photo was taken just after dawn on a partly cloudy summer morning. This shot is a combination  of 7 bracketed exposures and merged into an HDR image via Photomatix. Rush Hospital is located approximately 2.8 miles west of the center of Chicago (LaSalle St and Madision St). It is directly along the 290 (Eisenhower) expressway.  Before I captured this shot I took a few shots prior to the sun breaching the horizon.  The glow of the morning sunlight made the clouds a mixture of orange and pink.  These photos were very beautiful but I wanted an image of the sun coming through the buildings.  About 20 minutes after sunrise I captured this image.  Sunrise in general is an amazing experience and this was no exception.  If you have the chance to witness a sunrise from this spot I highly recommend it.


Editing the Shot

Screenshot 2018-08-17 20.41.24.png

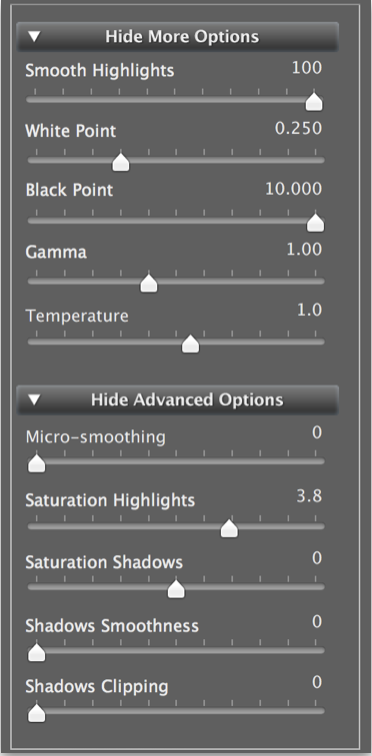
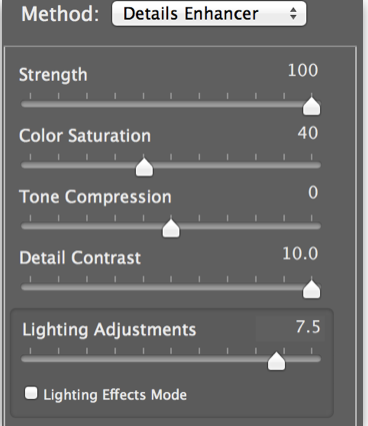
 The final image above is a high dynamic range photo which combines 7 exposures into 1 final photo. The trick is creating an image that has more dynamic range than a single image without making the image look over processed or fake. I did this by creating an image in Photomatix and then blending in one of the original exposures back into the HDR image. The Photomatix settings I used for this particular image are shown in the screenshot to the right. 

Screenshot 2018-08-17 20.42.29.png

Once I created the HDR image in Photomatix, I re-opened it in Adobe Photoshop and laid the most evenly exposed bracketed image on top of the Photomatix photo. From there I changed the opacity of the original exposure to soften the HDR effect and to help remove any unwanted halo affects.  This helped create a realistic HDR photo which retains many of the great characteristics of HDR while not looking over processed. This process created an image that is closer to what I saw while taking the photograph than either of the two images alone.


Other Tips

Get there early. The sun is sneaky coming off the horizon and depending on the time of year it comes up pretty quick. Use an app like The Photographer’s Ephemeris or similar apps to time your arrival. This app will also help you to pinpoint the the sunrise and sunset and will show you the angle of the sun to the city. 

50mm - f11 - 1/30 sec -  ISO 200

50mm - f11 - 1/30 sec -  ISO 200


How to Get There

Although Rush Hospital is right along the Eisenhower Expressway (Interstate 290) there aren’t a lot of public transportation options to get there. There is a Green line stop at Ashland and Lake but this stop is about 8 blocks from the hospital.  I also would not feel comfortable recommending anyone walking through this neighborhood if you don’t have to. Really your best bet is to drive to the parking structure and to pay for an hour of parking. 30 minutes of parking will cost you $8 while an hour will cost $9.75.  This is by far the best way to get to Rush if you have access to a car.  If you have to take a taxi you can go that route and when you are ready to leave you can have the information staff call you a cab to get home.  Cab fares should be less than $15 one way from most places within the city.


How to Support My Site

I love my photography and giving back to the community. If you like this site and want to support it I would greatly appreciate using the links to purchase any of the products in my posts. I also sell as well as a book "The Photographer's Guide to Capturing Chicago".If you want an easier way to replicate the shots in this post please consider purchasing my Lightroom presets using the link below. Thanks for stopping by and supporting my work!
Lightroom Presets

The Photographer's Guide to Capturing Chicago

tags: chicago
categories: Chicago
Monday 08.27.18
Posted by Thomas Campone
 

The Photographer's Guide to Capturing Chicago - Streaks of El

18mm - f22 - 13 sec -  ISO 320

18mm - f22 - 13 sec -  ISO 320

The Chicago train system has been a fascination of mine since I first moved to the city. Both the subways and the elevated trains provide this energy about the city. Everything from the the interesting shadows and structures that fall beneath the elevated tracks to the subway system and the tracks themselves can inspire images. I believe that you could build a portfolio of just photos of Chicago’s transit system.


How to Get the Shot

This image was taken on the Quincy/Wells Brown, Purple and Orange line stop in the early fall. I  shot this photo from the platform with my camera set up on a tripod.  I framed the shot and fired off 3 bracketed exposures to capture the buildings.  Then I waited for the train to come so I could capture it in a separate exposure.  The Chicago Transit Authority (CTA) normally won’t let you shoot with a tripod but for some reason I was able to get away with it for a few minutes.  Once the train came down the tracks I shot a 13.0 second exposure to capture the blurred train and its streaking lights.


Editing the Shot

When I got the photos on my computer the first thing I did was convert my bracketed photos into an High Dynamic Range (HDR) image.  For this particular image I wanted to minimize the HDR  “look” and use the 3 exposures to make the final image look realistic with just more detail in the buildings and in the shadows. I did this by tweaking my settings especially the “Lighting Adjustments” slider. Lightning Adjustments in Photomatix effect the how light is distributed throughout the image. If you move the slider to the right you will get a realistic effect. As you move it further to the left it distributes light from areas that were bright in the original image to the shadows and low light areas. This slider is the main reason that you see some HDR images that don’t match with how your brain processes the world around us. Sometimes it makes for a great effect but for this particular  image, I wanted to avoid this style. 

Screenshot 2018-07-07 21.58.08.png
Screenshot 2018-07-07 21.58.37.png

Next, I layered in the lights and train using photoshop.  Once the train image was brought into it’s own layer, I aligned the images using the Auto-Align Layers function in Adobe Photoshop .  This can be found in the edit menu.  It does a great job of making sure that all of your layers are aligned correctly without having to manually align them.

Next I flipped through the blending modes in the tools pallet to find a blending mode that made the lights of the train come through to the background image. The section of the list that starts with “Lighten” will allow the lighter parts of the image to come through and the section that starts with “Darken” will allow the darker parts of the image to come through.  I ended up using the “Dissolve” blending mode which got me 80% to the result I wanted. To finish the effect I grabbed the paintbrush tool and painted the rest of the light trails using a layer mask. 

Screenshot 2018-07-07 21.59.05.png

Other Tips

You can try to shoot on the platform with a tripod without the CTA’s permission but more times than not you will be asked to put away your tripod.  I’ve gotten lucky a few times but if you only have a weekend in Chicago you may not want to risk the shot.  If you go to the CTA’s website you can call to get approval to use your tripod.  See the link below for more information.

http://www.transitchicago.com/business/photopolicy.aspx

The other option is to bring a small tripod such as a GorillaPod or something similar. These small tripods are much smaller than regular sized tripods and if you attach it to a railing or such you may have better luck using it on the platform. 


How to Get There

Technically you can shoot this shot at any El stop but the stop that I took this photo and the surrounding loop stops have good vantage points of buildings which help create the urban feel of the photo.  To get to this particular station, you can take the Brown or Orange line to the Quincy/Wells stop. This stop is on the Southwestern side of the loop.  Either the Brown or Orange line should get you to the stop in a relatively short time.  If you need to take the Red line you can get off at the Jackson stop and walk 3 blocks west. 


How to Support My Site

I love my photography and giving back to the community. If you like this site and want to support it I would greatly appreciate using the links to purchase any of the products in my posts. I also sell as well as a book "The Photographer's Guide to Capturing Chicago".If you want an easier way to replicate the shots in this post please consider purchasing my Lightroom presets using the link below. Thanks for stopping by and supporting my work!

Lightroom Presets

The Photographer's Guide to Capturing Chicago

tags: Chicago
categories: Chicago
Monday 08.20.18
Posted by Thomas Campone
 

Drone Over Chicago's Grant Park

Drones are pretty amazing little tools. They can fly for miles, shoot 4k video and shoot raw images. I've been shooting some random B roll of Chicago and thought I would put together a little video to share with everyone. I expect to do more of these little videos in the upcoming months. Enjoy!

tags: Chicago, Drone, DJI, DJI Mavic Air
categories: Chicago
Saturday 08.18.18
Posted by Thomas Campone
 
Newer / Older

Powered by Squarespace.